The Java JRE needs to be installed on the computer/server running OrthoInspector.
Java is today pre-installed in many systems but you can proceed to your own installation.
Java comes into 2 flavours, the proprietary Oracle Java (Windows,Unix,mac OS) and the open-source openJDK Java (Unix, mac OS).
While Orthoinspector should be compatible with both, we recommend to use the Oracle Java installation (Orthoinspector being developed in this environment). Orthoinspector is only compatible with Java version 6 (December 2006) and superior.
2. Local blast+ toolkit installation (optionnal)
The NCBI blast suite needs to be installed on the computer/server running OrthoInspector. Orthoinspector requires the more recent blast+ toolkit in which the 'blastp' command is available (not the older toolkit, using the 'blastall' command).
Theoretically, any blast+ version should be compatible with Orthoinspector, but we recommend to use the latest release.
You can download the toolkit here (NCBI ftp server).
After installation, the command 'blastp' has to be accessible from your Unix/Mac OS/Windows console environments.
Note: we already experienced some changes in the blast ouput structure from previous blast+ versions, which forced us to update the Orthoinspector parsers. If you download a blast+ toolkit version which is more recent than the last version of OrthoInspector and experience some issues, please contact us.
3. An SQL engine supported by Java (recommended for analyses involving >100 species)
For small databases, Orthoinspector can use a SQLite database, which is a simple flat file.
If you intend to build a big orthology database (hundreds to thousands of species) you will need to install an SQL compatible database engine. We recommend the use of PostgreSQL or MySQL database engines, for which we provide full support in OrthoInspector.
The Postgres and MySQL Java JDBC drivers, which allow interactions between the database and Java, are pre-packed in the Orthoinspector package.
Any other SQL engine is compatible with Ortoinspector as long as a Java JDBC drivers is available for it.
For instance, if you want to use the SQLite engine, you just need to retrieve the corresponding JDBC driver and add it in the /lib directory (extracted from the OrthoInspector binaries archive).
Oracle provides a non-exhaustive list of supported engines. And more details about JDBC drivers and datase connection are available in the "installation tutorials".
4. Network environment (optional)
If you plan to install an orthology database in a network environment and want to exploit its data from remote machines, a specific tutorial compiles several advices facilitating such configuration.
If such error occurs, we recommend that you try to install the benchmark available in the "download" section on your system configuration. If the installation is successful, the error probably comes from erroneous sequence ids or input files that does not respects OrthoInspector requirements (see the tutorial "Prepare data to create your own database") .
Exception in thread "main" java.lang.OutOfMemoryError: Java heap space
This error occurs when the Java console ask for more memory than allowed by its default configuration.
A solution is to extend the maximum authorized memory by adding the -Xms or -Xmx console options during Java launch.
Examples:
This error occured in versions prior to 2.00 when parsing very large blast files during installation process. It has been corrected in version 2.00+.
Class--> start : Time : 1:18:43 ----> UndirectBlastUpdateWorker--> Blast format found: tabbed blast with comments (#)Class--> end : Time : 1:18:45 java.lang.ArrayIndexOutOfBoundsException: 3 at
org.igbmc.linard.orthoinspector.DBTools.updaters.blastdata.UndirectBlastUpdateWorker.lauchUpdate(UndirectBlastUpdateWorker.java:289)
This error has been reported for the combination of MySQL and Mac OS X v10, where the Java libraries report a different database URL spelling. This error is corrected since version 2.10 .
java.sql.SQLException: Access denied for user '.......' (using password: YES)
You will generate this kind of error when the database user that you setup in the database.properties file don't have the required database privileges. Your user should have the following database privileges:
all databases: INSERT, CREATE, UPDATE, SELECT : basal privileges. That should include the permission to create INDEX and CONSTRAINT commands, which is the case for default MySQL and postgreSQL users.
mySQL: "FILE" privilege (not allowed to default user)
postgreSQL: SELECT,INSERT privileges should be sufficient to execute "COPY" commands (default user)
other databases: any user privilege (equivalent to the previously mentioned privileges) that allow the transfer of data from the storage ( for example a CSV file) to the SQL database.
The FILE (MySQL) and INSERT (postgreSQL) privileges must be activated to allow respectively commands such as:
LOAD DATA INFILE '/path/to/best_hit.txt' INTO TABLE best_hit (pk_bh,pk_sequencea,pk_sequenceb,pk_organisma,pk_organismb,pk_version);
COPY best_hit (pk_bh,pk_sequencea,pk_sequenceb,pk_organisma,pk_organismb,pk_version) from '/path/to/best_hit.txt';
If these privileges are not granted, OrthoInspector will not succeed to transfer its data to your database engine. Also, be sure to execute the installation on the server/computer holding the engine (localhost).To understand how to give privileges to a database user, check the following documentation:
Note that in mySQL, you can avoid issues of loading files directly in the server by using the keyword LOCAL . Extract from mySQL doc: "Using LOCAL is a bit slower than letting the server access the files directly, because the contents of the file must be sent over the connection by the client to the server." The command would then look like :
LOAD DATA LOCAL INFILE '/path/to/best_hit.txt' INTO TABLE best_hit (pk_bh,pk_sequencea,pk_sequenceb,pk_organisma,pk_organismb,pk_version);
However, this change can be tricky as errors due to duplicate keys will only be reported as warnings...
java.sql.BatchUpdateException: Can't write; duplicate key in table 'xxxxxxxxxxxx'
Such error typically occurs after experiencing a crash during the installation process and attempting again the installation without cleaning the database. Basically, all primary data (sequences, blasts, inparalogs, orthologs) transferred to the database are associated to SQL primary keys to avoid issues related to duplicate entries. Before attempting again the installation step that crashed, do the following (for the corresponding installation step):
Step 1: delete the whole database and restart from the beginning.
Step 2: delete the content of the tables "best_hit", "putative_ inparalog", "ln_putative_inparalog_sequence", "hit", "blast", "no_hit", "no_hit_to_orga"
Step 3: delete the content of the tables "inparalog", "ln_inparalog_sequence"
Step 4: delete the content of the tables "onetoone", "onetomany", "manytomany"
UndirectBlastUpdateWorker--> Transfering dumps to database... DumpScripts--> Dumping table best_hit... java.sql.SQLException: File '/path/to/best_hit.txt' not found (Errcode: 13)
This error code (Errcode: 13) is thrown by your MySQL engine when the temporary dumps created by Orthoinspector cannot be read by the database engine. This happens typically when your SQL engine is on a different remote machine (where the directory doesn't exists). If you correctly installed the database from the machine holding the database engine, you are probably facing a problem of unix permissions. The temporary dumps files needs to be readable/executable by the user associated to the mysql process which is running in the background. The following threads can help you to resolve this issue:
As you may have already guessed, this is linked to command such as:
LOAD DATA INFILE '/path/to/best_hit.txt' INTO TABLE best_hit (pk_bh,pk_sequencea,pk_sequenceb,pk_organisma,pk_organismb,pk_version);
*Try manually the same SQL command from the SQL prompt, using the same SQL user that you invoke from orthoinspector. You will probably get the same error. You need to guess why your mysql instance cannot read the files you created in your directory. Check if all the parent directories of the directory used to produce these table dumps also allow mysql to read the files. Probably directly giving permissions to the mysql unix user to the directories where you work is the quickest solution:
Alternatively, you copy the dumps to the database manually ("dumps_only" procedure, website tutorials), and for all installation steps you copy manually the data to your database.
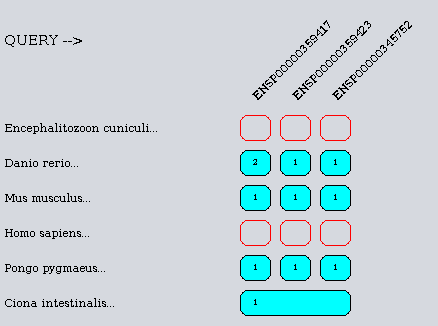
You can rapidly test OrthoInspector by using a database containing a test set of 6 organisms ( human, mouse, orangutan, zebrafish C. intestinalis and E. cuniculi ). We provide this dump for the SQLite, MySQL and Postgresql engines (see instructions below). They can be downloaded from the "Download" section of the website.
The fastest option is to download the SQLite version ,which is a simple falt file.
The more advanded option is to us a database engine (MySQL, Postgres). You will need to install and setup these engines. Tutorials for MySQL installation are available here and Postgresql installation, here.
1. Rapid test using a SQLite database
Download the SQLite database from the "Download" section of the website.
Extract the file called "oi.db" into the Orthoinspector directory (where the *.properties and *.jar files are).
Set the configuration file database.properties as follows:
# launches the graphical interface
java -jar OrthoInspector_gui.jar
# launches two command-line queries
# a. list the organisms available in the database
java -jar OrthoInspector_comline_client.jar -organism_ids
# b. retrieves as all the orthologs of organism 6
java -jar OrthoInspector_comline_client.jar -mode whole_organism -query 6 -organism_list all
# c. retrieves all the orthologs of organism 1 as an OrthoXML file
java -jar OrthoInspector_comline_client.jar -mode whole_organism -query 1 -organism_list all -outfmt 6
Note that this very fast configuration will not allow you to use some of the blast-related tools.
To do so, you will need to correctly setup the blast-related lines in the "GeneralProperties.proporties" configuration file.
2. Test on a MySQL installation
First create a new database schema in your database (i.e an empty database). Use a graphical tool such as mysqlworkbench or connect to the database and use this SQL command (you can replace 'orthoinspector_test' with any other database name):
create database orthoinspector_test;
Then, you can install the database dump with the following console command :
mysql -u login -p orthoinspector_test < orthoinspector_test_mysql_dump (same command for windows / unix / masOS)
Or directly by charging the dump in a mysql client interface like phpMyAdmin or mysqlinport. When the data transfer is finished, you need to setup a few lines in the configuration files:
To use the graphical interface : configure the files GeneralProperties.properties and database.properties
To use the command-line : configure the files oi_client.properties and database.properties
These files are in the zip archives that you downloaded.
In particular, the following lines have to been correctly filled :
In GeneralProperties.properties (or oi_client.properties), define the path of the file database.properties file (if not it is searched in the same directory). Configure also the path to the blastp binaries (part of the Blast+ NCBI package).
In database.properties, the java driver must be set to com.mysql.jdbc.Driver. The jar corresponding to this driver is in the OrthoInspector /lib directory. Add also the login / password that you choose for database access.
If you are not used to SQL installation and connection, a detailed configuration of these files is available in another tutorial.
3. Test on a PostgresSQL installation
You can install the database with the following console command :
Or directly by charging the dump in a mysql client interface like phpMyAdmin or mysqlinport. When the data transfer is finished, you need to setup a few lines in the configuration files:
To use the graphical interface : configure the files GeneralProperties.properties and database.properties
To use the command-line : configure the files oi_client.properties and database.properties
These files are in the zip archives that you downloaded.
In particular, the following lines have to been correctly filled :
In GeneralProperties.properties (or oi_client.properties), define the path of the database.properties file (if not it is searched the same directory). Configure also the path to the blastp binaries (part of the Blast+ NCBI package).
In database.properties, the java driver must be set to org.postgresql.Driver. The jar corresponding to this driver is in the OrthoInspector /lib directory. Add also the login / password that you choose for database access.
If you are not used to SQL installation and connection, a detailed configuration of these files is available in this tutorial.
If you intend to use a SQL database engine, it will need to be installed on the machine which will be used to install Orthoinspector. Ignore this is you plan to use a local SQLite database.
After the installation, Java JRE, the NCBI blast+ toolkit and OrthoInspector clients can be installed on different machines and connect to the database.
Please read the SOFTWARE REQUIREMENTS page for details.
Please read the "Configuration and exploitation in a network environment" page for network installation details.
2. Configure the database connection
The following steps describe how to setup the Orthoinspector configuration files to connect its clients to the SQL database.
a. Create a database of <100 species: use SQLite
Orthoinspector integrate the drivers and code to build a local SQLite database, which will be a simple flat file. This option is adapted to small databases, but not recommended for huge databases.
To use this approach, just fill the database.properties file as follows:
##################################################
# Mysql connection configuration
#
jdbc.drivers=org.sqlite.JDBC
jdbc.url=jdbc:sqlite:oi.db
jdbc.username=sqlite
jdbc.password=sqlite
###################################################
`̀ `
After this, jump directly to paragraph 3. (ignore all MYSQL and Postgres tutorials).
###a. Create a database of >100 species: use an external ,SQL database engine
In your database engine, create a database with your favourite name. This can be generally done via graphical interfaces supporting the database or via standard SQL commands in the SQL database prompt:
create database "oi_test";
For MySQL and Postgresql, you can avoid the following step b) , Orthoinspector will automatically configure its database at first connection (creating tables definitions and structures...). For other engines, you should create the Orthoinspector database schema (and adapt the syntax if necessary) by adapting manually several SQL commands. The Orthoinspector database schema and these commands are available in [this file](http://www.lbgi.fr/orthoinspector/binaries/database_schema_1.2_.zip).

###b. Download a Java driver for your database (for non MySQL/Postgresql users)

As described in the SOFTWARE REQUIREMENTS, Orthoinspector is compatible with all SQL engines for which a java [JDBC driver](https://en.wikipedia.org/wiki/Java_Database_Connectivity) is available. This driver generally comes as a "jar" archive (example: postgresql-9.3-1102.jdbc3.jar). For Postgresql and MySQL, drivers are already included in the Orthoinspector package and will be automatically loaded at startup.
If you use another database, find the corresponding driver (see [this page](http://www.oracle.com/technetwork/java/index-136695.html) for a non-exhaustive list). Don't uncompress the jar file and save it in the /lib directory that you extracted with the Orthoinspector package zip. Note that we developped OrthoInspector only with MySQL and Postgres, despite our best efforts to stick to strict SQL queries, bugs may pop-up with other engines.
__Set the selected driver in the "database.properties" file (pre-filled in the Orthoinspector zip archive).__


####database.properties , driver line examples :
mysql Driver: jdbc.drivers=com.mysql.jdbc.Driver
postgres Driver: jdbc.drivers=org.postgresql.Driver
This describes the "path" to the java Driver in the jar archive (the term "classpath" is used in Java programming) and dots separate the different levels of the path. To determine which classpath has to be defined for your driver, find the corresponding instructions which are generally in your driver documentation.

###c. Setup the connection between Orthoinspector and the database

Now that you have setup your driver, you need to provide an URL which describes how to access your SQL server.
This line is generally similar to:
jdbc:engine://address:port/database_name
To help you, here is a non-exhaustive list of URL templates for different engines.
__Set the URL in the "database.properties" file (pre-filled in the Orthoinspector zip archive).__

Note: if the database engine is installed on the local computer, replace the server name by "localhost".


####database.properties , URL line examples :
mysql Driver: jdbc.drivers=jdbc:mysql://localhost:3306/orthoinspector_test
postgres Driver: jdbc.url=jdbc:postgresql://monserver.com:5432/orthoinspector_test
###d. Grant special privileges to the database user for the initial installation !

During orthology inference, OrthoInspector will call several SQL statements that transfer data from local temporary files to the database engine. The database engine will allow such operations ONLY if the database user called by Orthoinspector possesses such privileges.
__The called user is defined in the  "database.properties" file (pre-filled in the Orthoinspector zip archive).__

####database.properties , users line examples :
jdbc.password=password
jdbc.username=login
__Using the administrator role of the database (created by default during database installation) is a good option and gives you these privileges.
If you use another database role, parse the documentation of your database engine to unlock privileges for the user called by OrthoInspector. This user needs the following standard SQL privileges:__

+ __all database tables__: INSERT, CREATE, UPDATE, SELECT : basal privileges + INDEX and CONSTRAINT creation privileges. These privileges are often granted by default to new mySQL and postgreSQL users.
+ __mySQL specificity__ : FILE privilege (not granted by default to a new user!). Grant this privilege to your user if you use mySQL, it will allow the transfer of data from temporary Orthoinspector files to the database.
+ __postgreSQL specificity__ : SELECT,INSERT privileges should be sufficient to execute "COPY" commands (default postgres user), the FILE privilege of MySQL having no equivalent in this engine.
+ __other databases__ : any user privilege (equivalent to the previously mentioned COPY privileges) that allow the transfer of data from an external file to the database.

These high privileges are required __only for the initial installation__ of the orthology database. Note that databases engines generally allow the call of such privileges (and consequently the initial installation) ONLY from the local machine where is installed the database server.
__In other words, for many SQL engines, the initial Orthoinspector installation has to be done from the machine holding the SQL server, not a remote machine.__

####More technical details about this privilege issue:

Privileges (FILE in MySQL; INSERT in Postgresql; ...) are required because Orthoinspector will call SQL statements such as:
LOAD DATA INFILE '/path/to/best_hit.txt' INTO TABLE best_hit (pk_bh,pk_sequencea,pk_sequenceb,pk_organisma,pk_organismb,pk_version); (mySQL)
COPY best_hit (pk_bh,pk_sequencea,pk_sequenceb,pk_organisma,pk_organismb,pk_version) from '/path/to/best_hit.txt'; (postgreSQL)
For these 2 engines, be sure to execute the installation process on the server/computer holding the engine (localhost), they don't allow remote installation whithout complex SQL/network ports setup. You can find more about the COPY privilege in the following documentations:

+ postgreSQL:  [http://www.postgresql.org/docs/9.1/static/sql-grant.html](http://www.postgresql.org/docs/9.1/static/sql-grant.html)
+ mySQL:  [http://dev.mysql.com/doc/refman/5.1/en/privileges-provided.html#priv_file](http://dev.mysql.com/doc/refman/5.1/en/privileges-provided.html#priv_file)

###e. After the initial installation ...

Following the initial database installation, Orthoinspector will no longer require the privileges mentioned before. A good idea is to create a database user dedicated to OrthoInspector exploitation to which only SELECT privileges are associated (i.e. a user that will only query the database but never insert new data). By connecting the database with such users, the database can be exploited from remote machines without risking to alter the the original database. The Orthoinspector command-line and graphical interfaces are simple clients connecting to the remote database. Such configuration is particularly useful when several pipelines installed on different server or several desktop computer want to exploit the database content.

See the "Configuration and exploitation in a network environment" tutorial for more details.

##3. Prepare your proteomes

Note: proteomes formats explained below can be mostly ignored if you use preformated sequences from a database such as Uniprot. A dedicated tutorial explains how to directly use Uniprot reference proteomes  in OrthoInspector.
Nevertheless, you may add your own proteomes to the Uniprot proteomes, then read carefully the section below when you manually modify your dataset.

###a. Fasta files of your proteomes

To avoid overpredictions of inparalogy relations,  we recommend that your proteomes contain one protein sequence per gene per species. If you don't correct the redundancy of your proteomes, splicing variants will induce an over-prediction of inparalogy groups and a potential overprediction of 1-to-many and many-to-many relations (and also slow down the predictions and create huge databases if you analyse hundreds of organisms). We also recommend to select the longest transcript variant per gene.

Prepare one fasta proteome per organism, there is not size limit for the proteome. Always respect the following convention for the fasta headers of your sequences :

+ __First character__ : >
+ __First word__ : the identifier that will be used for the sequence, avoid special characters, the identifier stops with the first encountered space character
+ __A space character__
+ __Any other words__ : anything you need for further human readability (the full description will be retrieved in future data extractions), but avoid special characters...
+ __The sequence itself__ : in one or several lines.
+ The fasta blocks (header+sequence) can be separated by one or several empty lines.

__Please note that Orthoinspector will filter sequences inferior to 20 residues, they will be transferred to the database but not used during orthology inference.__

When your sequences come from another database (uniprot/ncbi/ensembl), we recommend to keep their original identifiers (as they respect this convention). Special character generally found in the fasta headers of these databases can be kept and are correctly handled by Orthoinspector (mainly ( )- ' , . / |= [] ). For other sources, use short systems of identifiers, avoiding special characters.

The following example describes several fasta headers respecting OrthoInspector needs (the identifier automatically registered by orthoinspector is in bold) :
ORGANSIMIDENTIFIER +anycharacter(number or letter, avoid special characters)
MDRPAAAAAAGCEGGGGPNPGPAGGRRPPRAAGGATAGSRQPSVETLDSPTGSHVEWCKQLIAATISSQI
SGSVTSENVSRDYKALRDGNKLAQMEEAPLFPGESIKAIVKDVMYICPFMGAVSGTLTVTDFKLYFKNVE
```
  >MMUS002234 myotubularin-related protein GN=mtmr (a lab-made identifier)
  AFRAKGRVPVLSWIHPESQATITRCSQPLVGPNDKRCKEDEKYLQTIMDANAQSHKLIIFDARQNSVADT
  >gi|28872761|ref|NP_003819.1| myotubularin-related protein 1 [Homo sapiens]
  MDRPAAAAAAGCEGGGGPNPGPAGGRRPPRAAGGATAGSRQPSVETLDSPTGSHVEWCKQLIAATISSQI
  SGSVTSENVSRDYKALRDGNKLAQMEEAPLFPGESIKAIVKDVMYICPFMGAVSGTLTVTDFKLYFKNVE
b. The organism.xml file, describing your organisms and their taxonomy
Important Note: this file can be automatically generated by using Uniprot "Complete proteomes" and by following the corresponding tutorial. However, if you add your own proteomes to the database, follow the instructions below (or add them to the uniprot dataset).
Your species, their associated fasta proteome file, as well as metadata describing their taxonomy and source are registered in orthoinspector through a XML file. As a template, you can use the XML file included in the OrthoInspector ZIP (downloads section). The base structure to describe an organism is as follows :
The <date> field MUST ABSOLUTELY be in the YYYY-MM-DD format or else you will received SQL errors during the first step of the installation process ! If you still have some date format errors, check which kinds of date format your database engine can parse.
The <identifier> field can be any code that describes your organism and not necessarily linked to the content of your fasta proteomes, just avoid special characters.
<phylum>, <genus> and <species> Since version 2.00, these fields are essential to create trees in the graphical interface. The different phylum levels must be seperated by ';' and the same word must be used throughout all species to describe the same taxonomic level. A simple way to fill phylum information is to copy/past the clades extracted from the NCBI Taxonomy database (which uses this convention) for your different organisms.
The <bank> section will be used to fill the 'bank' table and is just informative, not essential to predictions.
Finally, the <fastafile> section is used to describe the path to the fasta proteome related to the described organism. This path can be absolute or relative but must be valid in regards to the location from which you launch the database installation. If not, the proteome will not be correctly loaded during the 1st step of installation and will generate "file not found" errors...
4. Generating the Blast all-against-all
You need to use the NCBI blast+ toolkit (contaning the blastp and makeblastdb commands).
The proteomes used to create the blast database needs to be the same proteomes that you setup in the organism.xml file.
Create a blast database with a concatenation of all your fasta proteomes. We recommand to use the -hash_index and -parse_seqids options. Lines below are commands for typical Unix / mac OS consoles:
Note: The option -parse_seqids should help to keep the identifiers from sources database (Uniprot/NCBI/ensembl) in the blast outputs and when the data will be exploited in the graphical interface.
Generate your blast all-against-all by blasting your concatenated proteomes to the blast database you created and use the 'tabular' blast output format, with or without comment lines ! (blastp command options -outfmt 7 or -outfmt 6 respectively ).
For large databases (>100 proteomes), your blast outputs can be compressed with GZIP. When loading the blast results, OrthoInspector will detect an eventual GZIP signature in the file and handle the decompression. Compressing the blast outputs can be done easily by redirecting ("pipe") the standard output (stdout) to a gzip command. Below is a command is for linux / mac OS consoles :
Before creating the complete blast all-against all (which can takes days to weeks when you have many proteomes), we recommend that you validate the output of your blast all-versus-all. Try the commands mentionned below but use as query a single sequence from one of your proteomes. You should confirm that the blast output contains the correct sequence identifiers in its 2 first columns (the query column and the blast hit column). As shown below, these 2 columns should contain sequence identifier exactly identical to the sequence identifiers defined by your original proteome files. Generally, a first line showing a match of the sequence to itself, for all queries, is confirming that you did things correctly.
You can also split you blast searches into several batches, Orthoinspector will load all blasts ouputs present in a directory (parse the benchmark, as an example). This is recommended when handling huge datasets. Basically, concatenate all your proteome sequences, then split them into smaller fasta files (typically 100 sequences per file, you will find many online scripts to do this). Then, each file can be used as a blast query, several blast can be launched simultaneously, each of them being attributed to a single CPU (or several cpus with the blast command option -num_threads). During the installation process of Orthoinspector, you will load the directory containing all the corresponding blast outputs, they will all be parsed.
Example of fasta sequences from the original fasta proteomes:
They are used to create the blast database, the files are registered in organism.xml file and, as described previoulsly. The characters before the first space are registered as ids (in bold below).
Mus musculus proteome content:
>ENSMUSP00000066894 Mus musculus, rem protein
AYFVVPTPLPEENVQRFQGHGIPIWSCHNGSALLKMSALPKEQDDGILQIQKSFLDGI
YKTIHRPPYEIVKTEDLSSNFLSLQEIQTAYSKFKQLFLIDNSTEFWDTDIKWFSLLESS
SWLDIIRRCLKKAIEITECMEAQNMN
Homo sapiens proteome content:
>ENSP00000264051 Homo sapiens, putative unknown protein
SDSLYIPIFSTFFFNSPHQKNMGREGQDTQSKPLNLLTVWDWSVQFEPKAQTLLKNPL
SSDELQDNFREFYDSWHSTDYHGLLLPHIEGPEIKVWAQRYLRWIPEAQILGGGQVAT
LSKLLEMMEEVQSLQEKID
Example of a correct blast output:
Ids are identical to the original fastas proteomes and should appear as a blast hit to itself in the first line. Note that the NCBI./Uniprot identifier formats (gi|4512466|gb|NU45422.1|) are generally appearing correctly in the blast output, keeping their | symbol.
This database is a great ressource to build your initial OrthoInspector database. Just download the proteomes of your clade of interest and eventually add your own proteomes to this initial set. To facilitate the installation of such data, the OrthoInspector_uinprot_tool.jar utility contain a script which generates the organism.xml file and formats the corresponding fastas (base files used during OrthoInspector installation). The tool also keeps the longest transcript available for each gene, keeping a single protein sequence representative per gene locus and avoiding over predictions of inparalogy relations due to several sequence variants for the same gene.
2. Using OrthoInspector_uniprot_tool.jar
a. Download a set of reference proteomes
Two files must be downloaded from uniprot:
A .dat file containing the taxonomic information of Uniprot
A fasta file contaning the sequence data matching to these same clades
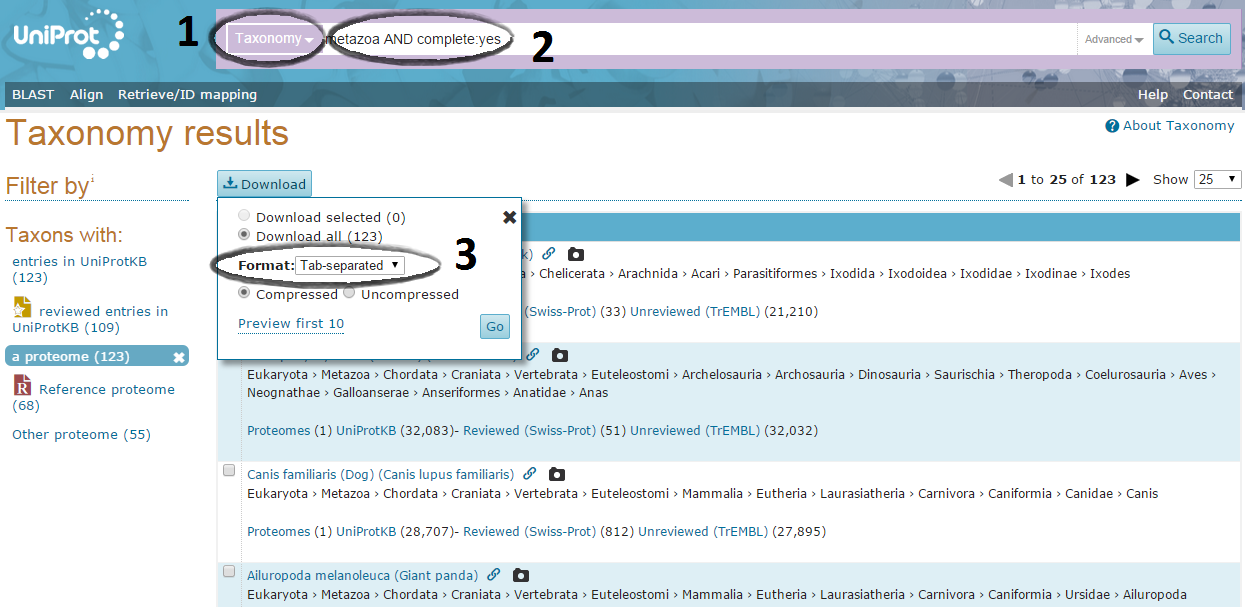
Downloading the taxonomy dat file:
Go to Uniprot website and choose the "Taxonomy" database. There enter the clade(s) for which you want to download proteomes, don't forget to mention that you want to select only the organisms for which a complete proteome is available.
A typical query will look like: insecta AND complete:yes
Download the corresponding results in a tab-separated format.
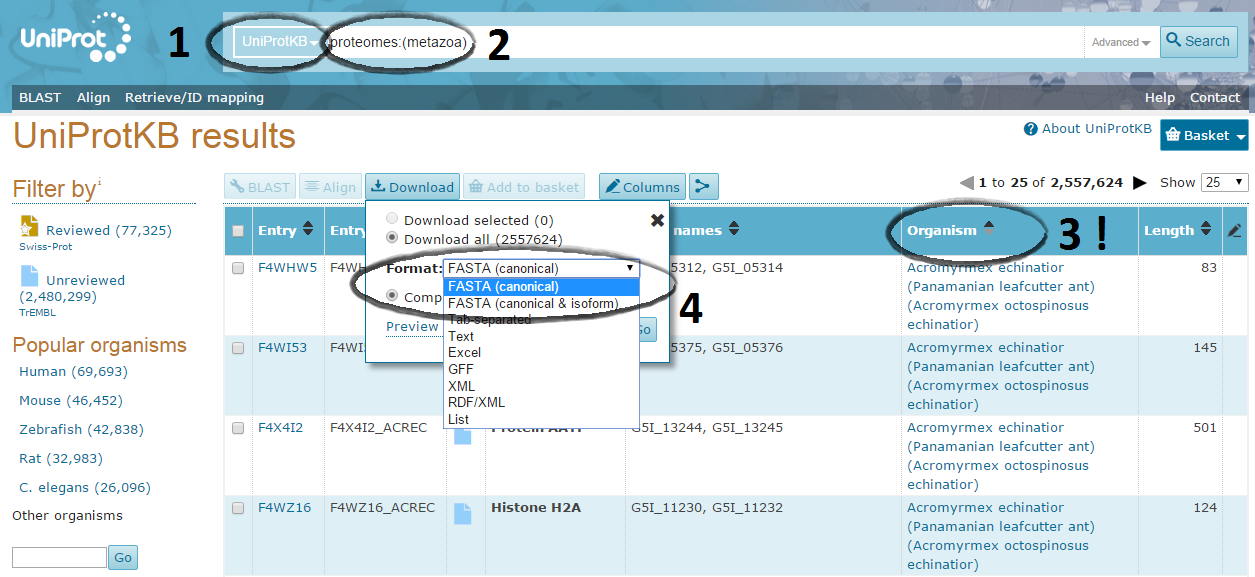
Downloading the corresponding fastas file:
Go now to the "UniprotKB" database, and enter a equivalent query to display the corresponding sequences.
A typical query will look like: proteomes:(insecta)
Reorder the entries by organism (compulsory).
Choose the "canonical" version of the proteomes, where each gene is represented by a single protein sequence and isoforms are absent !
Download the entries as a fasta.
You should now have two files. A tabbed-separated table describing the organisms and a fasta file contaning all their proteomes.
b. Use the utility to generate the OrthoInspector Input files
Use the 2 files retrieved from Uniprot to generate the OrthoInspector inputs:
You will obtain the OrthoInspector organism.xml metadata and corresponding proteomes as separated fastas.
Use them as inputs to install your database.
Here, eventually add your own data by adding more organisms definitions in the organism.xml file.
If you get some weird errors about reaching columns limits or number format errors, it may be that Uniprot changed its convention and the format of the fasta headers or the csv file. In this case, send us a mail. We will need to update the script.
Note about gene variants filtering
By default, Uniprot entries are parsed to detect the gene names associated to the sequences and to the longest protein is kept for each gene. This filtering can be desactivated with the option -ignore_redundancy_correction.
However, doing so will result in several variants per gene (in particular for model organisms) and an overprediction of inparalogy relations in OrthoInspector.
When entries aren't annotated with a gene name (i.e. no "GN=" field in the fasta) they are kept in the final output, each sequence potentially being a separate loci.
The behaviour of the filtering can be monitored through the log files generated by the script (*.fasta.removed.log)
Execution output lines examples:
Warning ! Sequences with no gene definition in Aedes aegypti : 2
Warning ! Sequences with no gene definition in Loxodonta africana : 2176
Warning ! Sequences with no gene definition in Bos taurus : 1577
Warning ! Sequences with no gene definition in Rhodnius prolixus : 15164

Content of 10090_Mus_musculus.fasta.removed.log :
"gene","filtered_sequence","filtered_length"
"Ywhaq",">sp|P68254|1433T_MOUSE 14-3-3 protein theta OS=Mus musculus GN=Ywhaq PE=1 SV=1",251
"Ppp2r1b",">sp|Q7TNP2|2AAB_MOUSE Serine/threonine-protein phosphatase 2A 65 kDa regulatory subunit A beta isoform OS=Mus musculus GN=Ppp2r1b PE=1 SV=2",613
"Sh3bp1",">sp|P55194|3BP1_MOUSE SH3 domain-binding protein 1 OS=Mus musculus GN=Sh3bp1 PE=1 SV=2",613
"Sh3bp2",">sp|Q06649|3BP2_MOUSE SH3 domain-binding protein 2 OS=Mus musculus GN=Sh3bp2 PE=1 SV=1",570
"Htr3a",">sp|P23979|5HT3A_MOUSE 5-hydroxytryptamine receptor 3A OS=Mus musculus GN=Htr3a PE=1 SV=1",497
Note about missing proteomes and phylum names duplicates:
Strangely, the taxonomy and proteome databases of Uniprot seems to not be perfectly synchronized and some organisms, while present in the downloaded .dat file, will not have fasta sequences...
This will be highlighted during the execution of the script:
XML output for : Drosophila willistoni
XML output for : Danaus plexippus
XML output for : Nasonia vitripennis
XML output for : Camponotus floridanus
SKIP XML output for : Drosophila yakuba (no sequences in the fasta)
XML output for : Drosophila virilis
XML output for : Culex quinquefasciatus
XML output for : Dendroctonus ponderosae
Another issue encoutered with Uniprot taxonomy is duplication of the phylum levels, a situation which is currently not supported by OrthoInspector and the way it manages its species tree. For instance:
This definition contains 2 times the word "Culex" (species and subspecies). The script will highlight this issue too, simply ignoring the last level (subspecies):
1. Advantages of Orthoinspector in a network environment
This section is valid only if you choose to use a MySQL or Postgres installation (not SQlite).
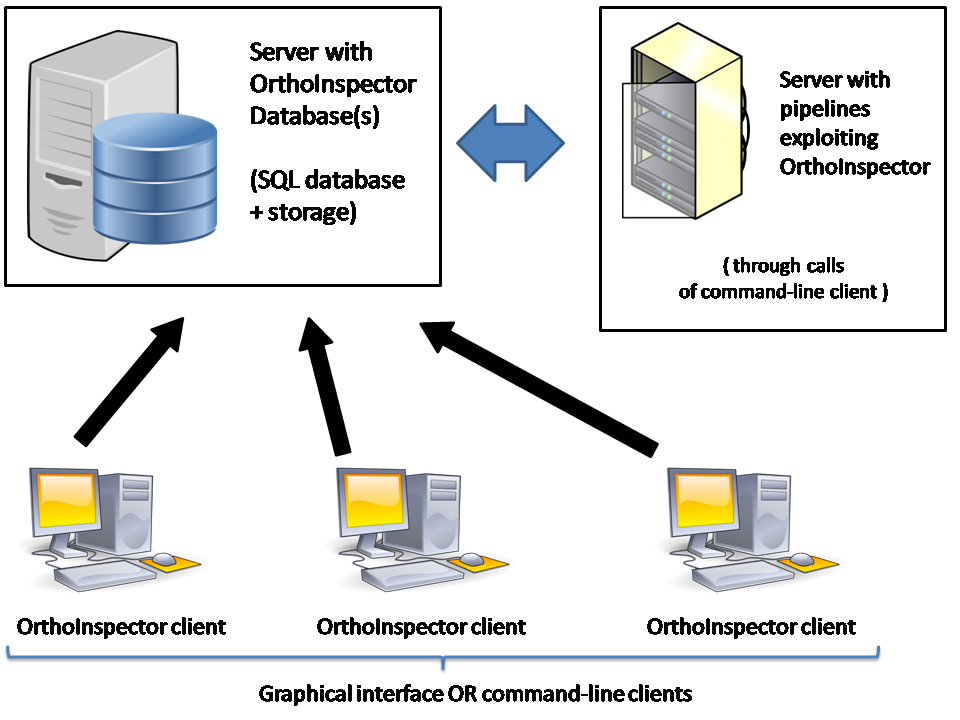
Orthoinspector binaries are operating as Java clients which connect to a SQL database. Consequently, inferred orthology databases and OrthoInspector tools can be easily exploited in a network environment. The following schema describe the recommended use of Orthoinspector in a laboratory network.
The OrthoInspector database is generated and stored on a dedicated server (top left). For large databases, this server is generally focused on fast storage read access and fast network transfers. Any Java compatible system is then able to connect this server to exploit the pre-calculated orthology relation through the Orthoinspector package. For instance, a second server can exploit Orthology predictions in the context of a pipeline through the use of the command-line client, which is specifically designed for such purpose. Any desktop computer connected to the network can also possess a local copy of Orthoinspector and exploit the database content via the command-line client or the Graphical interface client (recommended). The latter is specifically designed to facilitate the exploitation and the visualization of the large scale orthology data contained in the whole database.
Note that all machines can run different operating systems (OS) (Unix, Mac OS, Windows...), the only requirement being their ability to run Java code and connect the server holding the database.
2. Initial database installation
We recommend to install the database on a server designed for SQL database exploitation, i.e. with average CPU and memory configuration, but fast network access and fast storage read access. Indeed, the responsivity of OrthoInspector will be influenced by the speed with which the machine holding the database will answer to the SQL queries and transfer the results to the OrthoInspector clients.The initial installation requires special privileges associated to the database user (read/write access to the database). A good idea is to use the SQL database administrator role during initial database installation, with the corresponding login/password being setup in the OrthoInspector configuration file. More information is available in the installation tutorials.
3. Exploitation
Later exploitation (after installation) only requires basic privileges (SELECT database privilege, i.e. read access to its tables) between the database and the OrthoInspector clients. A good idea is to create a second database user, with read-only access to the database. You can set the login/password of this second user in the OrthoInspector configuration files on all machines connecting to the database server. To understand how to create /manage users, their privileges, and network connection permissions to the database, we recommand the following tutorials for Postgresql and MySQL.
1. Why using the command-line for orthology predictions (and not the graphical interface) ?
In most cases, prefer the command-line for initial orthologs predictions and database installation. It allows more options and flexibility. Using the command-line becomes particularly useful when you plan to generate very large orthology databases (>100 organisms) as the CPUs and memory requirements will increase and the installation becomes more easy on a server implementation. If you have no clue how to use command-lines, how to exploit a server or if you simply want to rapidly predict a small ortholog datasets, you can use the simplified procedure of the graphical interface (automated for MySQL and Postgresql databases).
2. Overview of the installation procedure
First, be sure to have read the "Prepare your data to create your own database" tutorial, which explains the pre-requisites of the installation in terms of input data format and connection to the SQL database.
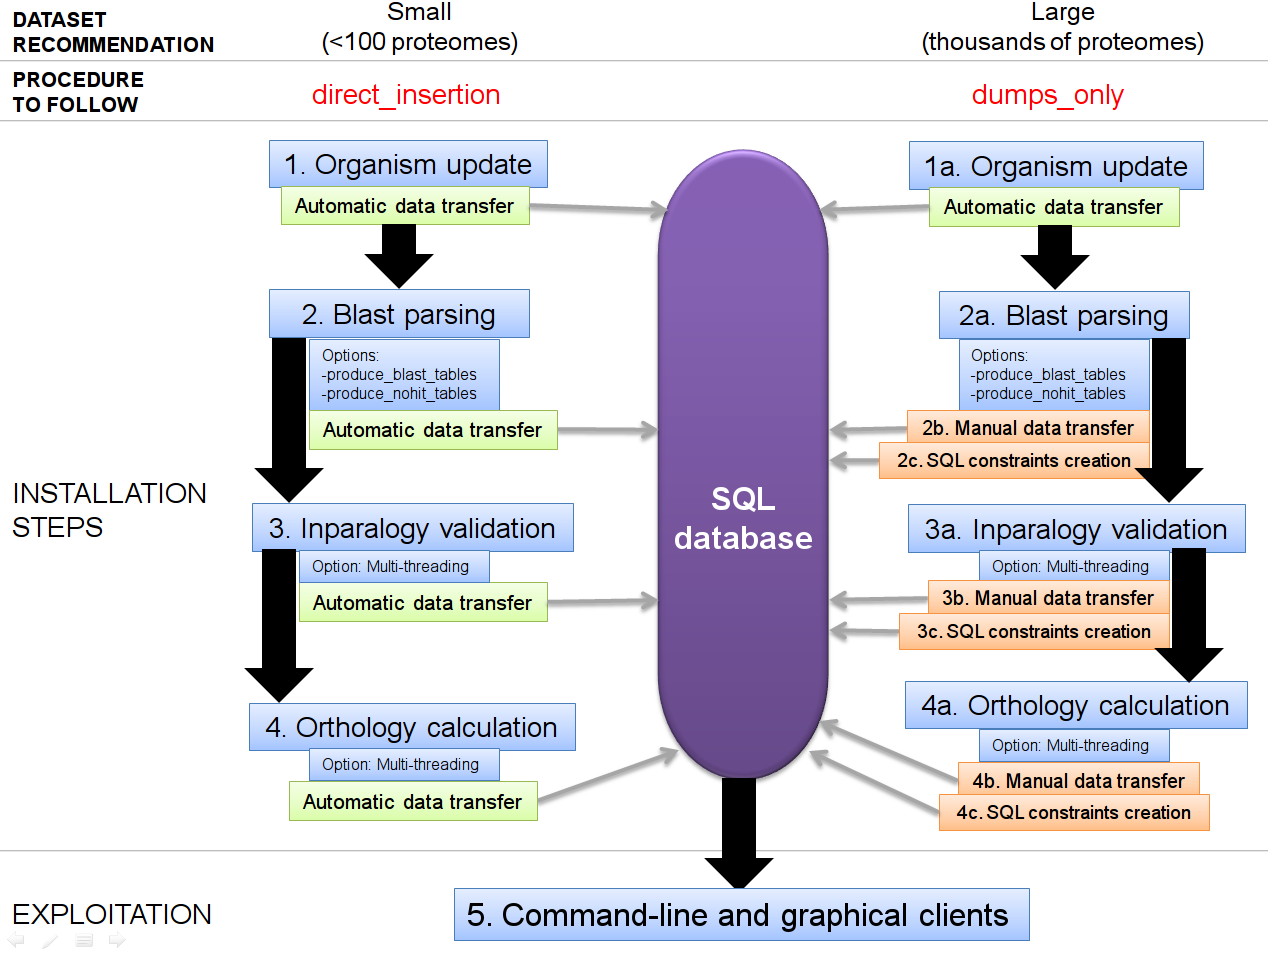
The installation procedure comes in two flavours:
+ a fast, local installation: ('qslite' mode) RECOMMENDED if you are not used to command-lines and SQL engines, but adapted onyl to small databases of less than 100 organisms. In this approach, a local SQLite database is created as a simple flat file.
+ a half-automatized installation: ('direct insertion' mode) compatible with Postgresql and MySQL engines. In this approach, the data transfers between OrthoInspector and the database, required during the installation, are automated.
+ a manual installation: ('dumps only' mode) generally recommended for very large datasets (hundreds to thousands of proteomes). In this approach, the data generated by OrthoInspector have to be manually transferred to the SQL database.
Both procedures are following 4 equivalent steps:
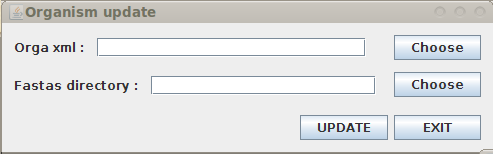
Organism update : organism data and proteome sequences are transferred to the database
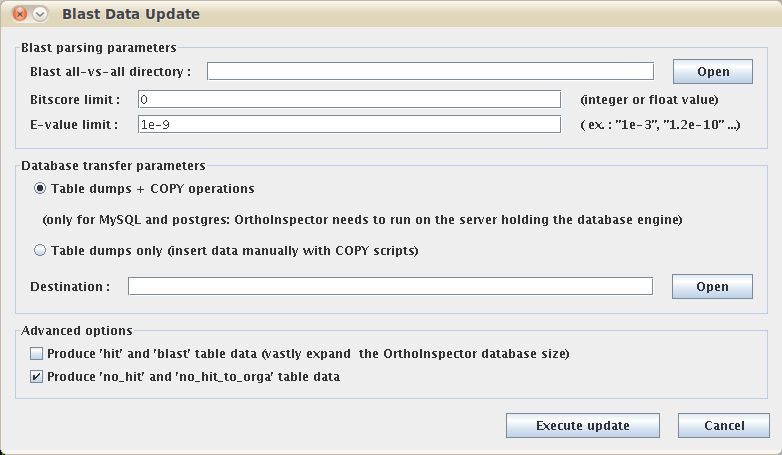
Blast parsing : blast data are parsed and best_hit / inparalogy information are analysed and sent to the database
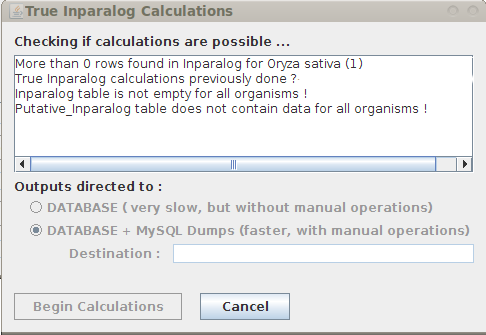
Inparalog validation : inparalog groups are validated and saved in the database
Orthology calculations : final 1-to-1, 1-to-many and many-to-many orthology relations are analysed and saved in the database
These 4 steps are sequential and step n+1 will be successful only when step n is finished and successful. Keep in mind these 4 steps.
IF A CRASH OCCURS DURING THE PROCEDURE:
If a crash occurs during one of the installation step, you will have to manually erase the corresponding SQL tables before any new attempt. Orthoinspector is not doing that automatically for you, because keeping table contents after a crash helps to resolve bugs or issues related to the data preparation. Here are the tables you need to empty if a crash occurs during the installation process. Also consult the "Troubleshooting" section.
Step 1: delete the whole database and restart from the beginning.
Step 2: delete the content of the tables "best_hit", "putative_inparalog", "ln_putative_inparalog_sequence", "hit", "blast", "no_hit", "no_hit_to_orga"
Step 3: delete the content of the tables "inparalog", "ln_inparalog_sequence"
Step 4: delete the content of the tables "onetoone", "onetomany", "manytomany"
3. Which procedure to choose: 'direct_insertion' or 'dumps_only' ?
Choosing between direct/dumps mode can be done in all installation steps with the following command-line option :
-database_outputs [direct_insertion/dumps_only]
a. direct_insertion
Semi-manual installation: more user-friendly (no SQL manipulation required), only require the execution of 4 consecutive commands and is compatible ONLY with Postgresql and MySQL databases.
Recommended if your database doesn't exceeds 1 million sequences and contains only ~100 proteomes.
In this procedure, the inparalogy/orthology relations calculated by orthoinspector are first saved on the disk as temporary database dumps, then automatically transferred to the database and finally automatically indexed in the database. With hundreds of proteomes, be aware that the execution could require up to 10~20 gb of RAM and can create dump files of hundreds of gigabytes. The GZIP compression options of the command-line can help to limit this problem.
b. dumps_only
Manual installation: adapted to huge amounts of data, datbases of hundreds to thousands of proteomes, but requires a minimum of SQL manipulation, which can introduce errors in the database if you are not careful.
Similarly to the 'direct_insertion' procedure, at each of the 4 installation steps, OrthoInspector predictions are saved as temporary database dumps on the local disk. Then, the transfer of these dumps to the database (followed by constraint/index creation) has to be done manually before jumping to the next installation step. Several sql and shell scripts are present in the OrthoInspector ZIP to help you, as well as the detailed tutorial below.
Be aware that large databases consumes hundreds of Gigabytes on the disk of the database server and can be slow if the machine is not optimized for fast storage read/write access. At the opposite, a well optimized and fast server allows to generated a database of hundreds to thousands of species (~500Gb of data) in a week (it took 15 days for our 1688 bacteria proteomes / 4 millions sequences database).
Be aware that for most database engines, the 'direct_insertion' procedure requires to run the Installation command-line on the computer/server that holds the database engine (COPY operations are called and database must be accessed as 'localhost').
4. Some comments about installation options...
Several options can be selected during the installation process and have consequences on the visualization tools that will be activated once the database is fully installed.
a. -gzip_dumps
Use this option to automatically compress with GZIP all orthoinspector outputs. Useful for large datasets to limit storage consumption.
b. -produce_blast_tables
Options valid only at the blast parsing step (step 2). When the option -produce_blast_tables is used, the content of the blast (all hits) are also used to create database dumps and are transferred to the database. By default, this data is not transferred to the database. This operation is equivalent to a copy of the blast all-vs-all, but formatted in the database. This data is used only by the "best hit density graph" tool, available in the graphical interface client. Using this option can greatly increased the storage needed in the SQL database side !
c. produce_nohit_tables
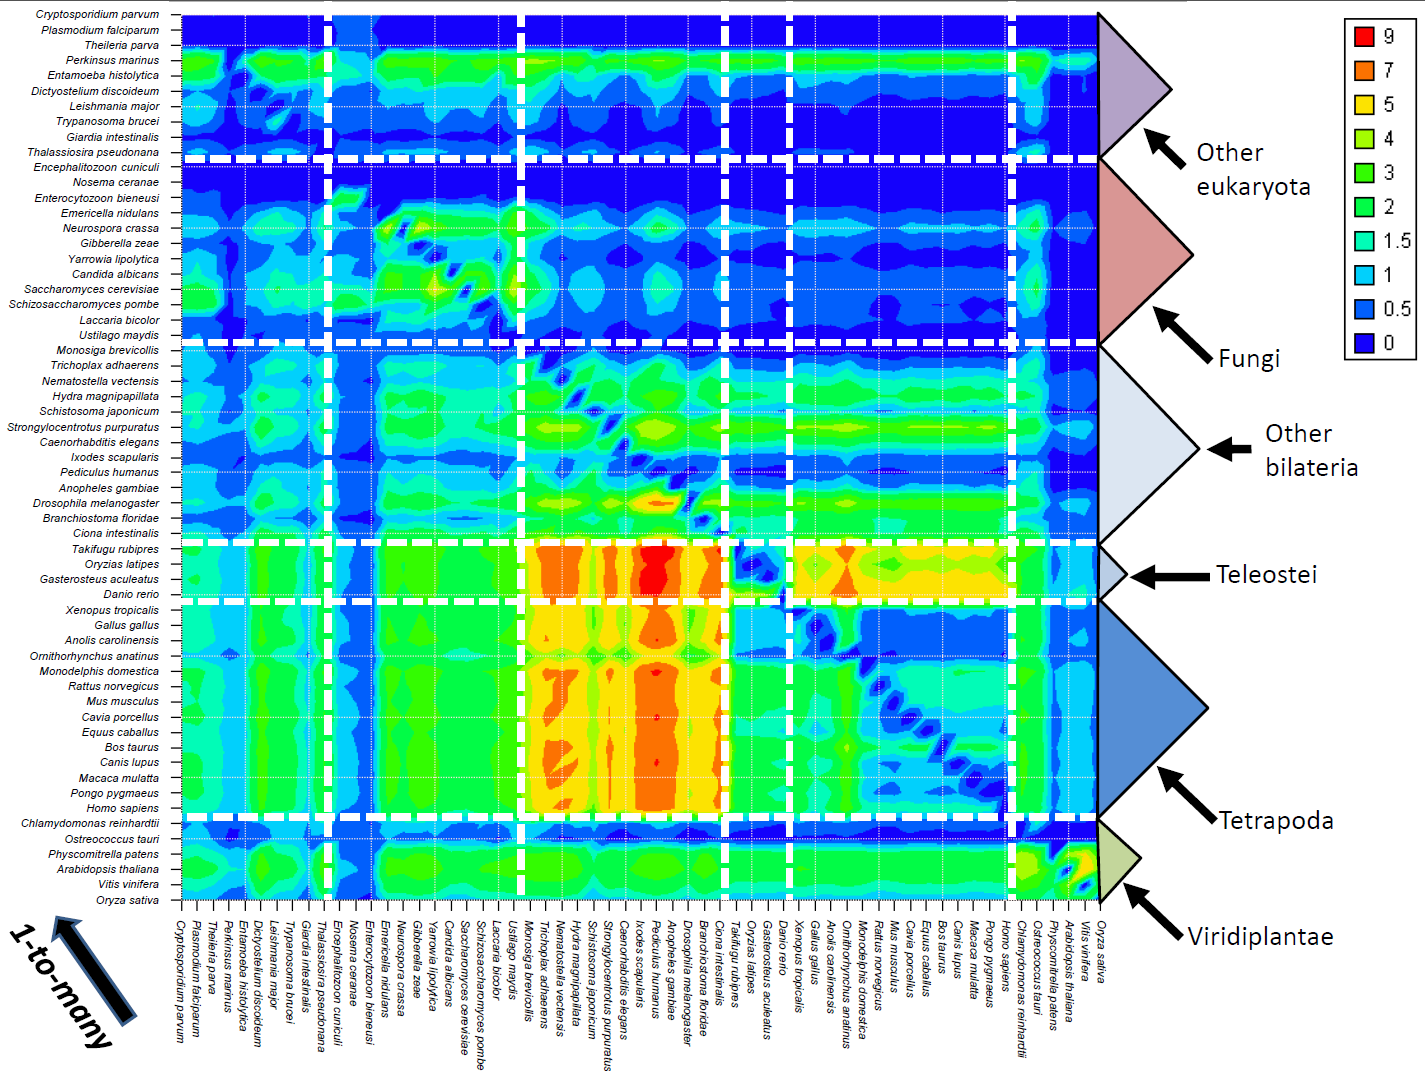
Options valid only at the blast parsing step (step 2). When the option -produce_nohit_tables is used, some supplementary statistics are saved in the database, such as the number of sequences that are homologous to nothing or only to specific clades... They are not created by default and are used only in the "extended statistics" tool, which is available in the graphical interface client. These statistics have been used, for instance, to produce the orthology heatmap published in the first Orthoinspector manuscript. They have no other use in the package.
d. -orgaid_start and -orgaid_end
Options used only in 'dumps_only' procedure. They are basically used to calculate very huge databases and the computation into smaller batch executions, which can then be used on several CPUs. See the "multi-threading" tutorial for more information.
5. Database schema creation
Since version 1.40, the database schema is automatically created by the command line at its first connection to an empty database, IF these database are MySQL or PostgresSQL engines. You can also manually create the schema with the following script: download . For any other engine, you may have to adapt it (in particular if the SQL syntax is slighlty different).
6. I choose the 'sqlite' procedure !
a. Organism update
Sequence and organism data are sent to the database. Use this command :
Blast results are parsed to define putative inparalog groups. The parser needs a particular blast format described in the "how to prepare your own data" tutorial. E-value and bitscore thresholds must be defined during this step. Use these parameters :
path_of_blast_allvsall: the directory contaning the blast ouputs produced during the blast all-versus-all. Note that all blast outputs needs to be in a directory containing ONLY the blast outputs, OrthoInspector will attempt to read all text files in this directory and will throw an error if a file which is not a blast ouput is encoutered (remove any readme, notes, other files from this directory...)
output_path: the directory in which eventual OrthoInspector outputs are written (in this step, several database dumps).
float_value: the blast Evalue tresholhold over which the blast hits are not considered, written as decimal (0.000000001) or exponential (1e-9).
integer_value: the blast score treshold below which blast hits are not considered, an integer (ex: 1 or 100)
The blast and hit tables can be very space consuming for big datasets and are only used in the "best-hit density graph" tool, available in the graphical interface (see this tutorial).
The no_hit tables are only used to produce some summary statistics in the graphical interface (see this tutorial)..
c. Inparalog validation
Putative inparalog groups are used to validate final inparalog groups. Use this command :
input_path: use any directory. In fact, the data is read from the database.
output_path: the directory in which eventual OrthoInspector outputs are written (in this step, several database dumps).
d. Orthology calculations
Orthologous 1-t-1, 1-t-m and m-t-m relations are precalculated and sent to database. Use these parameters :
input_path: use any directory. In fact, the data is read from the database.
output_path: the directory in which eventual OrthoInspector outputs are written (in this step, several database dumps).
7. I choose the 'direct insertion' procedure !
The following command are described both in a standard way and when applied to the small Benchmark (6 proteomes) available in the "download" section of the website. This benchmark is a good way to test OrthoInspector and to verify if eventual installation problems are due to your input data or a bug in the software (the benchmark contains "clean" data, respecting the data formats asked for inputs).
a. Organism update
Sequence and organism data are sent to the database. Use this command :
directory_of_xml_and_fasta_proteomes: the directory containing the proteomes and the organism.xml file that you prepared prior to the installation.
output_path: the directory in which eventual OrthoInspector outputs are written (in this step, nothing)
b. Blast parsing
Blast results are parsed to define putative inparalog groups. The parser needs a particular blast format described in the "how to prepare your own data" tutorial. E-value and bitscore thresholds must be defined during this step. Use these parameters :
path_of_blast_allvsall: the directory contaning the blast ouputs produced during the blast all-versus-all. Note that all blast outputs needs to be in a directory containing ONLY the blast outputs, OrthoInspector will attempt to read all text files in this directory and will throw an error if a file which is not a blast ouput is encoutered (remove any readme, notes, other files from this directory...)
output_path: the directory in which eventual OrthoInspector outputs are written (in this step, several database dumps).
float_value: the blast Evalue tresholhold over which the blast hits are not considered, written as decimal (0.000000001) or exponential (1e-9).
integer_value: the blast score treshold below which blast hits are not considered, an integer (ex: 1 or 100)
The following files are created in the output directory : best_hit.txt, blast.txt,i hit.txt, ln_putative_inparalog_sequence.txt and putative_inparalog.txt .
Note that the blast.txt, hit.txt, no_hit.txt, no_hit_to_orga.txt files are created and filled with data only when the -produce_blast_tables and -produce_nohit_tables command-line options are called.
The blast and hit tables can be very space consuming for big datasets and are only used in the "best-hit density graph" tool, available in the graphical interface (see this tutorial).
The no_hit tables are only used to produce some summary statistics in the graphical interface (see this tutorial)..
Note that these files will have the .gz extension if you use the output compression option ( -gzip_dumps).
In 'direct_insertion' mode dumps are automatically transferred to database tables.
c. Inparalog validation
Putative inparalog groups are used to validate final inparalog groups. Use this command :
input_path: use any directory. In fact, the data is read from the database.
output_path: the directory in which eventual OrthoInspector outputs are written (in this step, several database dumps).
The following files are created in the output directory : inparalog.txt, ln_inparalog_sequence.txt .
Note that these files will have the .gz extension if you use the output compression option ( -gzip_dumps).
In 'direct_insertion' mode dumps are automatically transferred to database tables.
d. Orthology calculations
Orthologous 1-t-1, 1-t-m and m-t-m relations are precalculated and sent to database. Use these parameters :
The following files are created in the output directory : manytomany.txt, onetomany.txt, onetoone.txt .
Note that these files will have the .gz extension if you use the output compression option ( -gzip_dumps).
input_path: use any directory. In fact, the data is read from the database.
output_path: the directory in which eventual OrthoInspector outputs are written (in this step, several database dumps).
In 'direct_insertion' mode dumps are automatically transferred to database tables.
8. I choose the 'dumps_only' procedure !
a. Overall description
You will basically use the same commands than the 'direct_insertion' procedure (see 4.). However, all the database dumps created in the output directory will not be transferred automatically in the database. This choice is motivated by several computational limitations emerging when the database is generated for thousands of proteomes and very huge. In particular, following this procedure allow you to:
Launch simultaneously several instance of Orthoinspector to use several CPUs and accelerate the calculations.
For very long calculations (several days to weeks), potential crashes may occur, in particular if memory requirements are higher than expected. By using the -orga-id_start and -orgaid_end options, you can separate the process into smaller batches.
The size of databases is rapidly growing with the number of proteomes is increasing. Before transferring the data to the database, you may need to verify the size of the generated dump and verify that you have enough storage on the database server.
Third, the databases constraints and indexes, created in the database to accelerate future queries, can also require dozen of Gigabytes for huge databases. Creating them manually at each step avoids bad surprises about storage.
To resume, the manual transfer of the dumps, follow by manual creation of the database constraints and queries, allow you a clear control of the storage space used over the 4 installation steps.
In the 'dumps_only' procedure, at each of the 4 steps, normal database manipulations are as follows:
first the same command, as defined in the 'direct_insertion' procedure, is used to generate the database dumps
if the computations are successful, transfer the dumps to the database with SQL commands (see below)
when the table is filled with this data, create the constraints/indexes associated to this particular step with another SQL commands (see below).
b. Some advices for huge databases (hundreds of eukaryotes, thousands of bacteria)
plan hundreds of Gigabytes for your database (for instance, our complete 256 eukaryotes database is 400 Gb when all index and constraints are created).
the foreign key constraints are not compulsory and can be ignored to economize storage. They are created by default in the automated procedure ('direct_insertion') as they validate the generated data before the next step.
after step 3 (inparalogy validation), the content of the 'putatitve_inparalog' and 'ln_putative_inparalog_sequence' tables can be deleted. This data is used in step tree to validate the inparalog groups (which are stored in the 'inparalog' and 'ln_inparalog_sequence' tables after step 3) and is not required for the final step 4, 'orthology calculations'. Do that when you are sure your step 3 worked fine, or you will have to regenerate again these tables by launching again step 2 and then relaunch step 3.
c. SQL commands to use at the end of each step
Here are the SQL commands you will use to conclude manually each step, as mentioned in 5.a. We give here the commands for Postgresql and MySQL engines. Adapt them for other engines if necessary.
For postgres:
Some SQL_scripts are in the OrthoInspector script archive. You just need to edit the database name in their header.
Alternatively, just execute these SQL commands:
---- Data transfer for "blast parsing" step--

copy best_hit (pk_bh,pk_sequencea,pk_sequenceb,pk_organisma,pk_organismb,pk_version) from '/path/to/best_hit.txt' ;
copy putative_inparalog (pk_putative_inparalog,pk_sequence,pk_organism,pk_organism_rapporteur,pk_version) from /path/to/putative_inparalog.txt' ;
copy ln_putative_inparalog_sequence (pk_putative_inparalog,pk_sequence) from '/path/to/ln_putative_inparalog_sequence.txt' ;
---- Add lines below, if you use the -produce_blast_tables -produce_nohit_tables options---
copy hit (pk_blast,pk_sequence,pk_version,percent_id,align_length,mismatches,gap_open,q_start,q_end,s_start,s_end,evalue,bitscore) from '/path/to/hit.txt' ;
copy blast (pk_blast,pk_version,pk_sequence) from '/path/to/blast.txt' ;
copy no_hit_to_orga (pk_organism,pk_sequence,pk_version) from '/path/to/no_hit_to_orga.txt' ;
copy no_hit (pk_sequence,pk_version) from '/path/to/no_hit.txt' ;
---- Constraints for "blast parsing step" ---
ALTER TABLE ONLY best_hit ADD CONSTRAINT pk_best_hit PRIMARY KEY (pk_bh);
ALTER TABLE ONLY putative_inparalog ADD CONSTRAINT pk_putative_inparalog PRIMARY KEY (pk_putative_inparalog);
ALTER TABLE ONLY best_hit ADD CONSTRAINT fk_best_hit_ref48 FOREIGN KEY (pk_sequencea) REFERENCES sequences(pk_sequence) ON UPDATE RESTRICT ON DELETE RESTRICT;
ALTER TABLE ONLY best_hit ADD CONSTRAINT fk_best_hit_ref49 FOREIGN KEY (pk_sequenceb) REFERENCES sequences(pk_sequence) ON UPDATE RESTRICT ON DELETE RESTRICT;
ALTER TABLE ONLY best_hit ADD CONSTRAINT fk_best_hit_reference_organism5 FOREIGN KEY (pk_organisma) REFERENCES organism(pk_organism) ON UPDATE RESTRICT ON DELETE RESTRICT;
ALTER TABLE ONLY best_hit ADD CONSTRAINT fk_best_hit_reference_organism6 FOREIGN KEY (pk_organismb) REFERENCES organism(pk_organism) ON UPDATE RESTRICT ON DELETE RESTRICT;
ALTER TABLE ONLY best_hit ADD CONSTRAINT fk_best_hit_reference_version FOREIGN KEY (pk_version) REFERENCES version(pk_version) ON UPDATE RESTRICT ON DELETE RESTRICT;
ALTER TABLE ONLY putative_inparalog ADD CONSTRAINT fk_putative_ref10 FOREIGN KEY (pk_organism_rapporteur) REFERENCES organism(pk_organism) ON UPDATE RESTRICT ON DELETE RESTRICT;
ALTER TABLE ONLY putative_inparalog ADD CONSTRAINT fk_putative_reference_organism9 FOREIGN KEY (pk_organism) REFERENCES organism(pk_organism) ON UPDATE RESTRICT ON DELETE RESTRICT;
ALTER TABLE ONLY putative_inparalog ADD CONSTRAINT fk_putative_reference_sequence7 FOREIGN KEY (pk_sequence) REFERENCES sequences(pk_sequence) ON UPDATE RESTRICT ON DELETE RESTRICT;
ALTER TABLE ONLY putative_inparalog ADD CONSTRAINT fk_putative_reference_version FOREIGN KEY (pk_version) REFERENCES version(pk_version) ON UPDATE RESTRICT ON DELETE RESTRICT;
ALTER TABLE ONLY ln_putative_inparalog_sequence ADD CONSTRAINT fk_ln_putat_reference_putative FOREIGN KEY (pk_putative_inparalog) REFERENCES putative_inparalog(pk_putative_inparalog) ON UPDATE RESTRICT ON DELETE RESTRICT;
CREATE INDEX best_hit_organisma ON best_hit USING btree (pk_organisma);
CREATE INDEX best_hit_organismb ON best_hit USING btree (pk_organismb);
CREATE INDEX best_hit_pk_sequencea ON best_hit USING btree (pk_sequencea);
CREATE INDEX best_hit_pk_sequenceb ON best_hit USING btree (pk_sequenceb);
CREATE INDEX index_putative_inparalog_pk_organism ON putative_inparalog USING btree (pk_organism);
CREATE INDEX index_putative_inparalog_pk_organism_rapporteur ON putative_inparalog USING btree (pk_organism_rapporteur);
CREATE INDEX index_putative_inparalog_pk_sequence ON putative_inparalog USING btree (pk_sequence);
CREATE INDEX index_putative_inparalog_sequence_pk_putative_inparalog ON ln_putative_inparalog_sequence USING btree (pk_putative_inparalog);
--- Add lines below, if you use the -produce_blast_tables -produce_nohit_tables options---
ALTER TABLE ONLY blast ADD CONSTRAINT pk_blast PRIMARY KEY (pk_blast);
ALTER TABLE ONLY blast ADD CONSTRAINT fk_blast_reference_sequence FOREIGN KEY (pk_sequence) REFERENCES sequences(pk_sequence) ON UPDATE RESTRICT ON DELETE RESTRICT;
ALTER TABLE ONLY blast ADD CONSTRAINT fk_blast_reference_version FOREIGN KEY (pk_version) REFERENCES version(pk_version) ON UPDATE RESTRICT ON DELETE RESTRICT;
ALTER TABLE ONLY hit ADD CONSTRAINT fk_hit_reference_blast FOREIGN KEY (pk_blast) REFERENCES blast(pk_blast) ON UPDATE RESTRICT ON DELETE RESTRICT;
ALTER TABLE ONLY hit ADD CONSTRAINT fk_hit_reference_sequence FOREIGN KEY (pk_sequence) REFERENCES sequences(pk_sequence) ON UPDATE RESTRICT ON DELETE RESTRICT;
ALTER TABLE ONLY hit ADD CONSTRAINT fk_hit_reference_version FOREIGN KEY (pk_version) REFERENCES version(pk_version) ON UPDATE RESTRICT ON DELETE RESTRICT;
CREATE INDEX blast_pk_sequence ON blast USING btree (pk_sequence);
CREATE INDEX hit_bitscore ON hit USING btree (bitscore);
CREATE INDEX hit_evalue ON hit USING btree (evalue);
CREATE INDEX hit_pk_blast ON hit USING btree (pk_blast);
CREATE INDEX hit_pk_sequence ON hit USING btree (pk_sequence);
ALTER TABLE ONLY no_hit ADD CONSTRAINT fk_no_hit_reference_sequence FOREIGN KEY (pk_sequence) REFERENCES sequences(pk_sequence) ON UPDATE RESTRICT ON DELETE RESTRICT;
ALTER TABLE ONLY no_hit ADD CONSTRAINT fk_no_hit_reference_version FOREIGN KEY (pk_version) REFERENCES version(pk_version) ON UPDATE RESTRICT ON DELETE RESTRICT;
ALTER TABLE ONLY no_hit_to_orga ADD CONSTRAINT fk_no_hit_t_reference_organism FOREIGN KEY (pk_organism) REFERENCES organism(pk_organism) ON UPDATE RESTRICT ON DELETE RESTRICT;
ALTER TABLE ONLY no_hit_to_orga ADD CONSTRAINT fk_no_hit_t_reference_sequence FOREIGN KEY (pk_sequence) REFERENCES sequences(pk_sequence) ON UPDATE RESTRICT ON DELETE RESTRICT;
ALTER TABLE ONLY no_hit_to_orga ADD CONSTRAINT fk_no_hit_t_reference_version FOREIGN KEY (pk_version) REFERENCES version(pk_version) ON UPDATE RESTRICT ON DELETE RESTRICT;
CREATE INDEX no_hit_pk_sequence ON no_hit USING btree (pk_sequence);
CREATE INDEX no_hit_to_orga_pk_organism ON no_hit_to_orga USING btree (pk_organism);
CREATE INDEX no_hit_to_orga_pk_sequence ON no_hit_to_orga USING btree (pk_sequence);

---- Data transfer for "inparalogy validation step" ---

copy inparalog (pk_inparalog,pk_organism,pk_organism_rapporteur,pk_version) from '/path/to/inparalog.txt' ;
copy ln_inparalog_sequence (pk_inparalog,pk_sequence) from '/path/to/ln_inparalog_sequence.txt' ;


---- Constraints for "inparalogy validation step" ---

ALTER TABLE ONLY inparalog ADD CONSTRAINT pk_inparalog PRIMARY KEY (pk_inparalog);
ALTER TABLE ONLY inparalog ADD CONSTRAINT fk_inparalo_ref11 FOREIGN KEY (pk_organism) REFERENCES organism(pk_organism) ON UPDATE RESTRICT ON DELETE RESTRICT;
ALTER TABLE ONLY inparalog ADD CONSTRAINT fk_inparalo_ref12 FOREIGN KEY (pk_organism_rapporteur) REFERENCES organism(pk_organism) ON UPDATE RESTRICT ON DELETE RESTRICT;
ALTER TABLE ONLY inparalog ADD CONSTRAINT fk_inparalo_reference_version FOREIGN KEY (pk_version) REFERENCES version(pk_version) ON UPDATE RESTRICT ON DELETE RESTRICT;
ALTER TABLE ONLY ln_inparalog_sequence ADD CONSTRAINT fk_ln_inpar_reference_inparalo FOREIGN KEY (pk_inparalog) REFERENCES inparalog(pk_inparalog) ON UPDATE RESTRICT ON DELETE RESTRICT;
ALTER TABLE ONLY ln_inparalog_sequence ADD CONSTRAINT fk_ln_inpar_reference_sequence FOREIGN KEY (pk_sequence) REFERENCES sequences(pk_sequence) ON UPDATE RESTRICT ON DELETE RESTRICT;
CREATE INDEX index_inparalog_pk_organism ON inparalog USING btree (pk_organism);
CREATE INDEX index_inparalog_pk_organism_rapporteur ON inparalog USING btree (pk_organism_rapporteur);
CREATE INDEX index_ln_inparalog_sequence_pk_inparalog ON ln_inparalog_sequence USING btree (pk_inparalog);
CREATE INDEX index_ln_inparalog_sequence_pk_sequence ON ln_inparalog_sequence USING btree (pk_sequence);


---- Data transfer for "orthology calculation" step ---

copy onetoone (pk_onetoone,pk_sequencea,pk_sequenceb,pk_organisma,pk_organismb) from '/path/to/onetoone.txt' ;
copy onetomany (pk_onetomany,pk_sequencea,pk_inparalogb,pk_organisma,pk_organismb) from '/path/to/onetomany.txt' ;
copy manytomany (pk_manytomany,pk_inparaloga,pk_inparalogb,pk_organisma,pk_organismb) from '/path/to/manytomany.txt'


---- Constraints for "orthology calculation" step ---

ALTER TABLE ONLY manytomany ADD CONSTRAINT pk_manytomany PRIMARY KEY (pk_manytomany);
ALTER TABLE ONLY onetomany ADD CONSTRAINT pk_onetomany PRIMARY KEY (pk_onetomany);
ALTER TABLE ONLY onetoone  ADD CONSTRAINT pk_onetoone PRIMARY KEY (pk_onetoone);
ALTER TABLE ONLY onetoone ADD CONSTRAINT fk_onetoone_ref120 FOREIGN KEY (pk_sequencea) REFERENCES sequences(pk_sequence) ON UPDATE RESTRICT ON DELETE RESTRICT;
ALTER TABLE ONLY onetoone ADD CONSTRAINT fk_onetoone_ref18 FOREIGN KEY (pk_organisma) REFERENCES organism(pk_organism) ON UPDATE RESTRICT ON DELETE RESTRICT;
ALTER TABLE ONLY onetoone ADD CONSTRAINT fk_onetoone_ref19 FOREIGN KEY (pk_organismb) REFERENCES organism(pk_organism) ON UPDATE RESTRICT ON DELETE RESTRICT;
ALTER TABLE ONLY onetoone ADD CONSTRAINT fk_onetoone_ref56 FOREIGN KEY (pk_sequenceb) REFERENCES sequences(pk_sequence) ON UPDATE RESTRICT ON DELETE RESTRICT;
ALTER TABLE ONLY manytomany ADD CONSTRAINT fk_manytoma_ref13 FOREIGN KEY (pk_inparaloga) REFERENCES inparalog(pk_inparalog) ON UPDATE RESTRICT ON DELETE RESTRICT;
ALTER TABLE ONLY manytomany ADD CONSTRAINT fk_manytoma_ref14 FOREIGN KEY (pk_inparalogb) REFERENCES inparalog(pk_inparalog) ON UPDATE RESTRICT ON DELETE RESTRICT;
ALTER TABLE ONLY manytomany ADD CONSTRAINT fk_manytoma_ref15 FOREIGN KEY (pk_organisma) REFERENCES organism(pk_organism) ON UPDATE RESTRICT ON DELETE RESTRICT;
ALTER TABLE ONLY manytomany ADD CONSTRAINT fk_manytoma_ref16 FOREIGN KEY (pk_organismb) REFERENCES organism(pk_organism) ON UPDATE RESTRICT ON DELETE RESTRICT;
ALTER TABLE ONLY onetomany ADD CONSTRAINT fk_onetoman_ref20 FOREIGN KEY (pk_organisma) REFERENCES organism(pk_organism) ON UPDATE RESTRICT ON DELETE RESTRICT;
ALTER TABLE ONLY onetomany ADD CONSTRAINT fk_onetoman_ref21 FOREIGN KEY (pk_organismb) REFERENCES organism(pk_organism) ON UPDATE RESTRICT ON DELETE RESTRICT;
ALTER TABLE ONLY onetomany ADD CONSTRAINT fk_onetoman_reference_inparalo FOREIGN KEY (pk_inparalogb) REFERENCES inparalog(pk_inparalog) ON UPDATE RESTRICT ON DELETE RESTRICT;
ALTER TABLE ONLY onetomany ADD CONSTRAINT fk_onetoman_reference_sequence FOREIGN KEY (pk_sequencea) REFERENCES sequences(pk_sequence) ON UPDATE RESTRICT ON DELETE RESTRICT;
CREATE INDEX onetomany_pk_inparalogb ON onetomany USING btree (pk_inparalogb);
CREATE INDEX onetomany_pk_organisma ON onetomany USING btree (pk_organisma);
CREATE INDEX onetomany_pk_organismb ON onetomany USING btree (pk_organismb);
CREATE INDEX onetomany_pk_sequencea ON onetomany USING btree (pk_sequencea);
CREATE INDEX onetoone_pk_organisma ON onetoone USING btree (pk_organisma);
CREATE INDEX onetoone_pk_organismb ON onetoone USING btree (pk_organismb);
CREATE INDEX onetoone_pk_sequencea ON onetoone USING btree (pk_sequencea);
CREATE INDEX onetoone_pk_sequenceb ON onetoone USING btree (pk_sequenceb);
CREATE INDEX manytomany_inparaloga ON manytomany USING btree (pk_inparaloga);
CREATE INDEX manytomany_inparalogb ON manytomany USING btree (pk_inparalogb);
CREATE INDEX manytomany_organisma ON manytomany USING btree (pk_organisma);
CREATE INDEX manytomany_organismb ON manytomany USING btree (pk_organismb);
For MySQL, you can use these commands:
---- Data transfer for "blast parsing" step--

LOAD DATA INFILE '/path/to/best_hit.txt' INTO TABLE best_hit (pk_bh,pk_sequencea,pk_sequenceb,pk_organisma,pk_organismb,pk_version);
LOAD DATA INFILE '/path/to/putative_inparalog.txt' INTO TABLE putative_inparalog (pk_putative_inparalog,pk_sequence,pk_organism,pk_organism_rapporteur,pk_version);
LOAD DATA INFILE '/path/to/ln_putative_inparalog_sequence.txt' INTO TABLE ln_putative_inparalog_sequence (pk_putative_inparalog,pk_sequence);
---- Add lines below, if you use the -produce_blast_tables -produce_nohit_tables options---
LOAD DATA INFILE '/path/to/blast.txt' INTO TABLE blast (pk_blast,pk_version,pk_sequence);
LOAD DATA INFILE '/path/to/hit.txt' INTO TABLE hit (pk_blast,pk_sequence_hit,pk_version,percent_id,align_length,mismatches,gap_open,q_start,q_end,s_start,s_end,evalue,bitscore);
LOAD DATA INFILE '/path/to/no_hit.txt' INTO TABLE no_hit (pk_sequence,pk_version);
LOAD DATA INFILE '/path/to/no_hit_to_orga.txt' INTO TABLE no_hit_to_orga (pk_organism,pk_sequence,pk_version);
---- Contraints for "blast parsing" step--

ALTER TABLE `best_hit` ADD CONSTRAINT `bh_orgaa_fk_constraint` FOREIGN KEY (`pk_organisma`) REFERENCES `organism` (`pk_organism`),
ADD CONSTRAINT `bh_orgab_fk_constraint` FOREIGN KEY (`pk_organismb`) REFERENCES `organism` (`pk_organism`),
ADD CONSTRAINT `bh_seqa_fk_constraint` FOREIGN KEY (`pk_sequencea`) REFERENCES `sequences` (`pk_sequence`),
ADD CONSTRAINT `bh_seqb_fk_constraint` FOREIGN KEY (`pk_sequenceb`) REFERENCES `sequences` (`pk_sequence`),
ADD CONSTRAINT `bh_version_fk_constraint` FOREIGN KEY (`pk_version`) REFERENCES `version` (`pk_version`);
ALTER TABLE `ln_putative_inparalog_sequence`
ADD CONSTRAINT `ln_putinparaseq_pk_putative_inparalog_fk_constraint` FOREIGN KEY (`pk_putative_inparalog`) REFERENCES `putative_inparalog` (`pk_putative_inparalog`),
ALTER TABLE `putative_inparalog`
ADD CONSTRAINT `putative_inparalog_pk_organism_fk_constraint` FOREIGN KEY (`pk_organism`) REFERENCES `organism` (`pk_organism`),
ADD CONSTRAINT `putative_inparalog_pk_organism_rapporteur_fk_constraint` FOREIGN KEY (`pk_organism_rapporteur`) REFERENCES `organism` (`pk_organism`),
ADD CONSTRAINT `putative_inparalog_pk_sequence_fk_constraint` FOREIGN KEY (`pk_sequence`) REFERENCES `sequences` (`pk_sequence`),
ADD CONSTRAINT `putative_inparalog_pk_version_fk_constraint` FOREIGN KEY (`pk_version`) REFERENCES `version` (`pk_version`);
--- Add lines below, if you use the -produce_blast_tables -produce_nohit_tables options---
ALTER TABLE `blast`
ADD CONSTRAINT `blast_pk_sequence_fk_constraint` FOREIGN KEY (`pk_sequence`) REFERENCES `sequences` (`pk_sequence`),
ADD CONSTRAINT `blast_pk_version_fk_constraint` FOREIGN KEY (`pk_version`) REFERENCES `version` (`pk_version`);
ALTER TABLE `hit`
ADD CONSTRAINT `hit_pk_blast_fk_constraint` FOREIGN KEY (`pk_blast`) REFERENCES `blast` (`pk_blast`),
ADD CONSTRAINT `hit_pk_sequence_hit_fk_constraint` FOREIGN KEY (`pk_sequence_hit`) REFERENCES `sequences` (`pk_sequence`),
ADD CONSTRAINT `hit_pk_version_fk_constraint` FOREIGN KEY (`pk_version`) REFERENCES `version` (`pk_version`);
ALTER TABLE `no_hit`
ADD CONSTRAINT `no_hit_pk_sequence_fk_constraint` FOREIGN KEY (`pk_sequence`) REFERENCES `sequences` (`pk_sequence`),
ADD CONSTRAINT `no_hit_pk_version_fk_constraint` FOREIGN KEY (`pk_version`) REFERENCES `version` (`pk_version`);
ALTER TABLE `no_hit_to_orga`
ADD CONSTRAINT `nhto_pk_organism_fk_constraint` FOREIGN KEY (`pk_organism`) REFERENCES `organism` (`pk_organism`),
ADD CONSTRAINT `nhto_pk_sequence_fk_constraint` FOREIGN KEY (`pk_sequence`) REFERENCES `sequences` (`pk_sequence`),
ADD CONSTRAINT `nhto_pk_version_fk_constraint` FOREIGN KEY (`pk_version`) REFERENCES `version` (`pk_version`);

---- Data transfer for "inparalogy validation" step--
LOAD DATA INFILE '/path/to/inparalog.txt' INTO TABLE inparalog (pk_inparalog,pk_organism,pk_organism_rapporteur,pk_version);
LOAD DATA INFILE '/path/to/ln_inparalog_sequence.txt' INTO TABLE ln_inparalog_sequence (pk_inparalog,pk_sequence);

---- Contraints for "inparalogy validation" step--

ALTER TABLE `inparalog` ADD CONSTRAINT `inparalog_pk_organism_fk_constraint` FOREIGN KEY (`pk_organism`) REFERENCES `organism` (`pk_organism`),
ADD CONSTRAINT `inparalog_pk_organism_rapporteur_fk_constraint` FOREIGN KEY (`pk_organism_rapporteur`) REFERENCES `organism` (`pk_organism`),
ADD CONSTRAINT `inparalog_pk_version_fk_constraint` FOREIGN KEY (`pk_version`) REFERENCES `version` (`pk_version`);
ALTER TABLE `ln_inparalog_sequence` ADD CONSTRAINT `ln_inparaseq_pk_inparalog_fk_constraint` FOREIGN KEY (`pk_inparalog`) REFERENCES `inparalog` (`pk_inparalog`),
ADD CONSTRAINT `ln_inparaseq_pk_sequence_fk_constraint` FOREIGN KEY (`pk_sequence`) REFERENCES `sequences` (`pk_sequence`)

---- Data transfer for "orthology calculation" step--

LOAD DATA INFILE '/path/to/onetoone.txt' INTO TABLE onetoone (pk_onetoone,pk_sequencea,pk_sequenceb,pk_organisma,pk_organismb);
LOAD DATA INFILE '/path/to/onetomany.txt' INTO TABLE onetomany (pk_onetomany,pk_sequencea,pk_inparalogb,pk_organisma,pk_organismb);
LOAD DATA INFILE \'/path/to/manytomany.txt\' INTO TABLE manytomany (pk_manytomany,pk_inparaloga,pk_inparalogb,pk_organisma,pk_organismb);

---- Contraints for "orthology calculation" step--

ALTER TABLE `manytomany`
ADD CONSTRAINT `mtm_inparaa_fk_constraint` FOREIGN KEY (`pk_inparaloga`) REFERENCES `inparalog` (`pk_inparalog`),
ADD CONSTRAINT `mtm_inparab_fk_constraint` FOREIGN KEY (`pk_inparalogb`) REFERENCES `inparalog` (`pk_inparalog`),
ADD CONSTRAINT `mtm_orgaa_fk_constraint` FOREIGN KEY (`pk_organisma`) REFERENCES `organism` (`pk_organism`),
ADD CONSTRAINT `mtm_orgab_fk_constraint` FOREIGN KEY (`pk_organismb`) REFERENCES `organism` (`pk_organism`);
ALTER TABLE `onetomany`
ADD CONSTRAINT `otm_inparab_fk_constraint` FOREIGN KEY (`pk_inparalogb`) REFERENCES `inparalog` (`pk_inparalog`),
ADD CONSTRAINT `otm_orgaa_fk_constraint` FOREIGN KEY (`pk_organisma`) REFERENCES `organism` (`pk_organism`),
ADD CONSTRAINT `otm_orgab_fk_constraint` FOREIGN KEY (`pk_organismb`) REFERENCES `organism` (`pk_organism`),
ADD CONSTRAINT `otm_seqa_fk_constraint` FOREIGN KEY (`pk_sequencea`) REFERENCES `sequences` (`pk_sequence`);
ALTER TABLE `onetoone`
ADD CONSTRAINT `oto_orgaa_fk_constraint` FOREIGN KEY (`pk_organisma`) REFERENCES `organism` (`pk_organism`),
ADD CONSTRAINT `oto_orgab_fk_constraint` FOREIGN KEY (`pk_organismb`) REFERENCES `organism` (`pk_organism`),
ADD CONSTRAINT `oto_seqa_fk_constraint` FOREIGN KEY (`pk_sequencea`) REFERENCES `sequences` (`pk_sequence`),
ADD CONSTRAINT `oto_seqb_fk_constraint` FOREIGN KEY (`pk_sequenceb`) REFERENCES `sequences` (`pk_sequence`);
First, be sure to have read the "Install database with the command-line" tutorial.
As a reminder, the installation procedure follows 4 steps :
Organism update : organism data and sequences are transfered to the database
Blast parsing : blast data are parsed and best_hit information is sent to the database
Inparalog validation : inparalog groups are validated
Orthology calculations : 1-to-1, 1-to-many and many-to-many relations are analysed
The 2 last steps (steps 3 an 4) can be achieved by using multiple CPUs simultaneously.
OrthoInspector is not using a real multi-threading algorithm you can launch several OrthoInspector instances in parallel, each one generating a fraction of the database. Note that this approach can be used only with the 'dumps_only ' mode where you need to transfer the data manually to the SQL engine (see command line installation tutorial for details).
All the following examples are based on the OrthoInspector benchmark, which can be downloaded in the "Downloads" section of the website.
1. Divide your calculations on several CPUs
Before starting any multi-threading approach, be aware that these supplementary manual interventions are justified ONLY if your database contains hundreds to thousands of proteomes. For smaller datasets, there is generally no need to split the predictions on multiple CPUs.
Following the 'blast parsing step' (step 2), verify the number of organisms that are loaded in your database by the OrthoInspector client (oi_client.jar).
List of available organisms :
- id=1   identifier=ECUN         Encephalitozoon cuniculi
- id=2   identifier=ENSP         Homo sapiens
- id=3   identifier=ENSPPYG         Pongo pygmaeus
- id=4   identifier=ENSMUSP         Mus musculus
- id=5   identifier=ENSDARP         Danio rerio
- id=6   identifier=ENSCINP         Ciona intestinalis
Total : 6 organisms
With such database, we can decide to share the predictions on 2 CPUs. The first one will perform the computation for the organisms 1 to 3 and the second for the organisms 4 to 6.
2. Inparalogy validations on several CPUs
Two processes are launched in parallel with the following commands:
The files starting with 1_3 prefix contains inparalog data for organisms 1 to 3. The files starting with 4_6 prefix contains inparalog data for organisms 4 to 6. Before achieving all instances, it is impossible to determine how many inparalog groups will be validated. Consequently, in each dump (1_3 and 4_6) the validated inparalog groups have database ids starting with the value 1. This needs to be changed as primary keys cannot be duplicated in a database.
To do so, retrieve the value of the last key in the first inparalog.txt dump: in 1_3_inparalog.txt, the last key (column 1) is 7608. We need to update the dumps 4_6_inparalog.txt and 4_6_ln_inparalog_sequence.txt with new keys starting at 7609. To do so, use the small utility present in the OrthoInspector archive since version 2.12 : UpdateDatabaseKeys.jar .
Two updated files, updated_4_6_inparalog.txt and updated_4_6_ln_inparalog_sequence.txt, are created. Then, concatenate the different batch files in a single dump file that you can transfer in the database (the following example is for a postgres database).
Or transfer each file independently, as you prefer. Just don't forget to use the updated files.
  cat 1_3_inparalog.txt > inparalog.txt                  (first file don't need to be changed)
  cat updated_4_6_inparalog.txt >> inparalog.txt         (all other files need id updates)
  (in postgres client) copy inparalog (pk_inparalog,pk_organism,pk_organism_rapporteur,pk_version) from '/path/to/inparalog.txt'
  (in postgres client) copy ln_inparalog_sequence (pk_inparalog,pk_sequence) from '/path/to/ln_inparalog_sequence.txt'
As you are in 'dumps_only' procedure, after successful transfer, don't forget to create manually the indexes / constraints for these 2 tables.
  --- POSTGRES INSTALLATION ---
  ---- Contraints for "inparalogy validation" step--
  ADD CONSTRAINT pk_inparalog PRIMARY KEY (pk_inparalog);
  ALTER TABLE ONLY ln_inparalog_sequence ADD CONSTRAINT fk_ln_inpar_reference_sequence FOREIGN KEY (pk_sequence) REFERENCES sequences(pk_sequence) ON UPDATE RESTRICT ON DELETE RESTRICT;
  ALTER TABLE ONLY ln_inparalog_sequence ADD CONSTRAINT fk_ln_inpar_reference_inparalo FOREIGN KEY (pk_inparalog) REFERENCES inparalog(pk_inparalog) ON UPDATE    RESTRICT ON DELETE RESTRICT;
  ALTER TABLE ONLY inparalog ADD CONSTRAINT fk_inparalo_reference_version FOREIGN KEY (pk_version) REFERENCES version(pk_version) ON UPDATE RESTRICT ON DELETE RESTRICT;
  ALTER TABLE ONLY inparalog ADD CONSTRAINT fk_inparalo_ref12 FOREIGN KEY (pk_organism_rapporteur) REFERENCES organism(pk_organism) ON UPDATE RESTRICT ON DELETE RESTRICT;
  ALTER TABLE ONLY inparalog ADD CONSTRAINT fk_inparalo_ref11 FOREIGN KEY (pk_organism) REFERENCES organism(pk_organism) ON UPDATE RESTRICT ON DELETE RESTRICT;
  CREATE INDEX index_ln_inparalog_sequence_pk_sequence ON ln_inparalog_sequence USING btree (pk_sequence);
  CREATE INDEX index_ln_inparalog_sequence_pk_inparalog ON ln_inparalog_sequence USING btree (pk_inparalog);
  CREATE INDEX index_inparalog_pk_organism_rapporteur ON inparalog USING btree (pk_organism_rapporteur);
  CREATE INDEX index_inparalog_pk_organism ON inparalog USING btree (pk_organism);
The process is similar but doesn't require a manual check of the values of the keys in the generated dump files.
2 processes are launched in parallel with the following commands:
  (in postgres client) copy onetoone (pk_onetoone,pk_sequencea,pk_sequenceb,pk_organisma,pk_organismb) from '/path/to/updated_onetoone.txt'
  (in postgres client) copy onetomany (pk_onetomany,pk_sequencea,pk_inparalogb,pk_organisma,pk_organismb) from '/path/to/updated_onetomany.txt'
  (in postgres client) copy manytomany (pk_manytomany,pk_inparaloga,pk_inparalogb,pk_organisma,pk_organismb) from '/path/to/updated_manytomany.txt'
Then, create manually the indexes / constraints for these 3 tables and your database is ready for exploitation. :)
--- POSTGRES INSTALLATION ---
---- Contraints for "orthology calculation" step--
ALTER TABLE ONLY onetoone  ADD CONSTRAINT pk_onetoone PRIMARY KEY (pk_onetoone);
ALTER TABLE ONLY onetomany ADD CONSTRAINT pk_onetomany PRIMARY KEY (pk_onetomany);
ALTER TABLE ONLY manytomany ADD CONSTRAINT pk_manytomany PRIMARY KEY (pk_manytomany);
ALTER TABLE ONLY onetomany ADD CONSTRAINT fk_onetoman_reference_sequence FOREIGN KEY (pk_sequencea) REFERENCES sequences(pk_sequence) ON UPDATE RESTRICT ON DELETE RESTRICT;
ALTER TABLE ONLY onetomany ADD CONSTRAINT fk_onetoman_reference_inparalo FOREIGN KEY (pk_inparalogb) REFERENCES inparalog(pk_inparalog) ON UPDATE RESTRICT ON DELETE RESTRICT;
ALTER TABLE ONLY onetomany ADD CONSTRAINT fk_onetoman_ref21 FOREIGN KEY (pk_organismb) REFERENCES organism(pk_organism) ON UPDATE RESTRICT ON DELETE RESTRICT;
ALTER TABLE ONLY onetomany ADD CONSTRAINT fk_onetoman_ref20 FOREIGN KEY (pk_organisma) REFERENCES organism(pk_organism) ON UPDATE RESTRICT ON DELETE RESTRICT;
ALTER TABLE ONLY manytomany ADD CONSTRAINT fk_manytoma_ref16 FOREIGN KEY (pk_organismb) REFERENCES organism(pk_organism) ON UPDATE RESTRICT ON DELETE RESTRICT;
ALTER TABLE ONLY manytomany ADD CONSTRAINT fk_manytoma_ref15 FOREIGN KEY (pk_organisma) REFERENCES organism(pk_organism) ON UPDATE RESTRICT ON DELETE RESTRICT;
ALTER TABLE ONLY manytomany ADD CONSTRAINT fk_manytoma_ref14 FOREIGN KEY (pk_inparalogb) REFERENCES inparalog(pk_inparalog) ON UPDATE RESTRICT ON DELETE RESTRICT;
ALTER TABLE ONLY manytomany ADD CONSTRAINT fk_manytoma_ref13 FOREIGN KEY (pk_inparaloga) REFERENCES inparalog(pk_inparalog) ON UPDATE RESTRICT ON DELETE RESTRICT;
ALTER TABLE ONLY onetoone ADD CONSTRAINT fk_onetoone_ref56 FOREIGN KEY (pk_sequenceb) REFERENCES sequences(pk_sequence) ON UPDATE RESTRICT ON DELETE RESTRICT;
ALTER TABLE ONLY onetoone ADD CONSTRAINT fk_onetoone_ref19 FOREIGN KEY (pk_organismb) REFERENCES organism(pk_organism) ON UPDATE RESTRICT ON DELETE RESTRICT;
ALTER TABLE ONLY onetoone ADD CONSTRAINT fk_onetoone_ref18 FOREIGN KEY (pk_organisma) REFERENCES organism(pk_organism) ON UPDATE RESTRICT ON DELETE RESTRICT;
ALTER TABLE ONLY onetoone ADD CONSTRAINT fk_onetoone_ref120 FOREIGN KEY (pk_sequencea) REFERENCES sequences(pk_sequence) ON UPDATE RESTRICT ON DELETE RESTRICT;
CREATE INDEX manytomany_organismb ON manytomany USING btree (pk_organismb);
CREATE INDEX manytomany_organisma ON manytomany USING btree (pk_organisma);
CREATE INDEX manytomany_inparalogb ON manytomany USING btree (pk_inparalogb);
CREATE INDEX manytomany_inparaloga ON manytomany USING btree (pk_inparaloga);
CREATE INDEX onetoone_pk_sequenceb ON onetoone USING btree (pk_sequenceb);
CREATE INDEX onetoone_pk_sequencea ON onetoone USING btree (pk_sequencea);
CREATE INDEX onetoone_pk_organismb ON onetoone USING btree (pk_organismb);
CREATE INDEX onetoone_pk_organisma ON onetoone USING btree (pk_organisma);
CREATE INDEX onetomany_pk_sequencea ON onetomany USING btree (pk_sequencea);
CREATE INDEX onetomany_pk_organismb ON onetomany USING btree (pk_organismb);
CREATE INDEX onetomany_pk_organisma ON onetomany USING btree (pk_organisma);
CREATE INDEX onetomany_pk_inparalogb ON onetomany USING btree (pk_inparalogb);


--- MYSQL INSTALLATION ---
---- Contraints for "orthology calculation" step--
ALTER TABLE `manytomany`ADD CONSTRAINT `mtm_inparaa_fk_constraint` FOREIGN KEY (`pk_inparaloga`) REFERENCES `inparalog` (`pk_inparalog`),
ADD CONSTRAINT `mtm_inparab_fk_constraint` FOREIGN KEY (`pk_inparalogb`) REFERENCES `inparalog` (`pk_inparalog`),
ADD CONSTRAINT `mtm_orgaa_fk_constraint` FOREIGN KEY (`pk_organisma`) REFERENCES `organism` (`pk_organism`),
ADD CONSTRAINT `mtm_orgab_fk_constraint` FOREIGN KEY (`pk_organismb`) REFERENCES `organism` (`pk_organism`);
ALTER TABLE `onetomany`
ADD CONSTRAINT `otm_inparab_fk_constraint` FOREIGN KEY (`pk_inparalogb`) REFERENCES `inparalog` (`pk_inparalog`),
ADD CONSTRAINT `otm_orgaa_fk_constraint` FOREIGN KEY (`pk_organisma`) REFERENCES `organism` (`pk_organism`),
ADD CONSTRAINT `otm_orgab_fk_constraint` FOREIGN KEY (`pk_organismb`) REFERENCES `organism` (`pk_organism`),
ADD CONSTRAINT `otm_seqa_fk_constraint` FOREIGN KEY (`pk_sequencea`) REFERENCES `sequences` (`pk_sequence`);
ALTER TABLE `onetoone`
ADD CONSTRAINT `oto_orgaa_fk_constraint` FOREIGN KEY (`pk_organisma`) REFERENCES `organism` (`pk_organism`),
ADD CONSTRAINT `oto_orgab_fk_constraint` FOREIGN KEY (`pk_organismb`) REFERENCES `organism` (`pk_organism`),
ADD CONSTRAINT `oto_seqa_fk_constraint` FOREIGN KEY (`pk_sequencea`) REFERENCES `sequences` (`pk_sequence`),
ADD CONSTRAINT `oto_seqb_fk_constraint` FOREIGN KEY (`pk_sequenceb`) REFERENCES `sequences` (`pk_sequence`);`1
1. Why using the graphical interface for installation (and not the command-line) ?
If you have no clue how to use command-lines, how to perform server installations, or if you simply want to rapidly predict a small ortholog dataset, you can use the simplified procedure of the graphical interface. But be aware that the command-line allows more options and flexibility (data compression, virtual multi-threading...) when you plan to generate very large orthology databases (>100 organisms) as the CPUs and memory requirements will increase. Generating such database with the graphical interface is possible, but any crash (in particular during days to week long calculations) are difficult to recover with the graphical interface, contrary to the command line where orthology prediction can be separated in small complementary batches.
WARNING: CURRENTLY, THIS FEATURE IS BROKEN IF YOU WANT TO USE A SQLITE DATABASE. (Use the command-line instead)
2. Overview of the installation procedure
First, be sure to have read the "Prepare your data to create your own database" tutorial, which explains the pre-requisites of the installation in terms of input data format and connection to the SQL database.
The installation procedure comes in two flavours:
a half-automatized installation: (referred below as 'direct insertion') compatible with Postgresql and MySQL engines. In this case, the data transfers between OrthoInspector and the database, required during the installation, are automated.
a manual installation: (referred below as 'dumps only') generally required for very large datasets (hundreds to thousands of proteomes). In this case, the data generated by OrthoInspector have to be manually transferred to the SQL database.
Both procedures are following 4 equivalent steps:
Organism update : organism data and sequences are transferred to the database
Blast parsing : blast data are parsed and best_hit information are analysed and optionally sent to the database
Inparalog validation : inparalog groups are validated and saved in the database
Orthology calculations : 1-to-1, 1-to-many and many-to-many relations are analysed and saved in the database
These 4 steps are sequential and step n+1 will be successful only when step n is finished and successful. Keep in mind these 4 steps.
IF A CRASH OCCURS DURING THE PROCEDURE:
If a crash occurs during one of the installation step, you will have to manually erase the corresponding SQL tables before any new attempt. Orthoinspector is not doing that automatically for you, because keeping table contents after a crash helps to resolve bugs or issues related to the data preparation. Here are the tables you need to empty if a crash occurs during the installation process. Also consult the "Troubleshooting" section.
Step 1: delete the whole database and restart from the beginning.
Step 2: delete the content of the tables "best_hit", "putative_inparalog", "ln_putative_inparalog_sequence", "hit", "blast", "no_hit", "no_hit_to_orga"
Step 3: delete the content of the tables "inparalog", "ln_inparalog_sequence"
Step 4: delete the content of the tables "onetoone", "onetomany", "manytomany"
3. Which procedure to choose: 'direct_insertion' or 'dumps_only' ?
Choosing between direct/dumps mode can be done in all installation steps. contrary to the command line, where the procedure is chosen with a command-line option, the graphical interface simply propose a checkbox in each of the 4 steps.
a. direct_insertion
Semi-manual installation: more user-friendly (no SQL manipulation required), only require the execution of 4 consecutive commands and is compatible ONLY with Postgresql and MySQL databases. It is recommended if your database doesn't exceeds 1 million sequences, contains <100 proteomes. In this procedure, the inparalogy/orthology relations calculated by orthoinspector are first saved on the disk as temporary database dumps, then automatically transferred to the database and finally automatically indexed in the database. With hundreds of proteomes, be aware that the execution could require up to 10~20 gb of RAM and can create dump files of several hundreds of gigabytes.
b. dumps_only
Manual installation: adapted to huge amounts of data, databases of hundreds to thousands of proteomes, but requires a minimum of SQL manipulation, which can easily introduce manual errors. Similarly to the 'direct_insertion', at each of the 4 installation steps, OrthoInspector predictions are saved as temporary database dumps on the local disk. Then, the transfer of these dumps and the creation of database constraint/index has to be realized manually before jumping to the next step. Several sql and shell scripts are present in the OrthoInspector ZIP to help you, as well as the detailed tutorial below. Be aware that large databases consumes hundreds of Gigabytes on the disk of the database server and can be slow if the machine is not optimized for fast storage read/write access. At the opposite, a well optimized and fast server allows to generated a database of hundreds to thousands of species (~500Gb of data) in a week (it took 15 days for our 1688 bacteria proteomes / 4 millions sequences database).
Be aware that the 'direct_insertion' mode requires to run the OrthoInspector installation on the computer/server that holds the database engine (COPY operations are called and database must be accessed as 'localhost').
4. Some comments about installation options...
Several options can be selected during the installation and have consequences on the visualization tools that will be activated once the database is fully installed. Not all options available in the command-line are accessible through the graphical interface installation. In particular, multi-threading and GZIP compression options are absent.
a. produce_blast_tables
Options valid only at the blast parsing step (step 2). When the option -produce_blast_tables is used, the content of the blast (all hits) are also used to create database dumps and are transferred to the database. By default, this data is not transferred to the database. This operation is equivalent to a copy of the blast all-vs-all, but formatted in the database. This data is used only by the "best hit density graph" tool, available in the graphical interface client. Using this option can greatly increased the storage needed in the SQL database side !
b. produce_nohit_tables
Options valid only at the blast parsing step (step 2). When the option -produce_nohit_tables is used, some supplementary statistics are saved in the database, such as the number of sequences that are homologous to nothing or only to specific clades... They are not created by default and are used only in the "extended statistics" tool, which is available in the graphical interface client. These statistics have been used, for instance, to produce the orthology heatmap published in the first Orthoinspector manuscript. They have no other use in the package.
5. Database schema creation
Since version 1.40, the database schema is automatically created by the command line at its first connection to an empty database, IF these database are MySQL or PostgresSQL engines. You can also manually create the schema with the following script: download. For any other engine, you will have to adapt it (in particular if the SQL syntax is slightly different).
6. Proceed to the installation !
a. Database schema
Since version 1.40, database schema is automatically created during the first connection to the empty database that you defined in 'database.properties'.
You can also create MySQL and PostgresSQL schema manually: download.
If OrthoInspector is connecting for the first time to an empty database, a message will notify this automated creation.
If your database is created and if the schema is correclty installed, you should have the following messages in the interface :
b. Organism update
Sequence and organism data are sent to database. Select the path of the fasta proteome files containing your fasta proteomes sequences and the organism.xml file describing your organisms (see "Prepare your data to create your own database" for details).
Click on "update" and wait for the end of the transfer.
c. Blast parsing
Blast results are parsed to define putative inparalog groups. The parser needs the 'tabular with comment lines' blast ouput format (option: -outfmt 7, see "Prepare your data to create your own database" for details). E-value and bitscore thresholds must be defined for the parsing. The bitscore must be an integer and the evalue can be in the format 0.000000001 or 1e-9.
First select the directory containing all your blast files (tab-formatted). Note that all blast outputs needs to be in a directory containing ONLY the blast outputs, OrthoInspector will attempt to read all text files in this directory and will throw an error if a file which is not a blast ouput is encoutered (remove any readme, notes, other files from this directory...).Then enter bitscore and/or e-value thresholds. Finally, select the mode to transfer data and click on "execute update" to begin the process.
Advanced options refers to the direct_insertion (dumps + COPY operations) and the dumps_only procedure (dumps only). You can also activate/skip the creation of the blast data tables (1) and 'no_hit' / 'no_hit_to_orga' tables (2) (produce_blast_table and produce_nohit_table options mentionned previously).
Skipping the creation of these tables can be useful to accelerate the installation and rapidly test some prototype version of your orthology database.
Moreover, the blast option will transfer all your blasts outputs to the database, which can require a huge amount of storage.
You will however loose these functionalities :
1. The 'best-hit density graph' will not be accessible.
2. Database statistics, calculated in the 'Database Statistics' tool will be incomplete.
The following files are created in the output directory : best_hit.txt, ln_putative_inparalog_sequence.txt and putative_Inparalog.txt.
The files blast.txt, hit.txt, no_hit.txt and no_hit_to_orga.txt are filled with data only is you selected their creation in the advanced options.
In 'direct_insertion' mode they will be automatically copied into database tables.
In 'dumps_only' mode you need to transfer the data manually, as described in the command-line tutorial.
3. Inparalog validation
Putative inparalog groups are used to validate final inparalog groups. You just need to select the mode to transfer data. Then click on "Begin calculations". Again, you just have to choose between the 'direct insertion' (outputs directed to database) or 'dumps_only' (outputs directed to database + mysql dumps) procedures.
The following files are created in the output directory : inparalog.txt, ln_inparalog_sequence.txt .
In 'direct_insertion' mode they will be automatically copied into database tables.
In 'dumps_only' mode you need to transfer the data manually, as described in the command-line tutorial.
4. Orthology calculations
Orthologous 1-t-1, 1-t-m and m-t-m relations are precalculated and sent to database. You just need to select the mode to transfer data. Then click on "Begin calculations". Again, you just have to choose between the 'direct insertion' (outputs directed to database) or 'dumps_only' (outputs directed to database + mysql dumps) procedures.
The following files are created in the output directory : manytomany.txt, onetomany.txt, onetoone.txt.
In 'direct_insertion' mode they will be automatically copied into the database tables.
In 'dumps_only' mode you need to transfer the data manually, as described in the command-line tutorial.
The command-line client is designed to retrieve orthology relations from the generated database and export these relations in different file formats (CSV, XML, ORTHOXML, FASTA ...). It doesn't allow enhanced queries such as "phylogenetic profile based extraction" (graphical client only) and doesn't generate graphical representations of the data (graphical client only). This client is however easy to call from a script and facilitates the inclusion of OrthoInspector data into a pipeline.
2. Initial configuration
Configure the oi_client.properties file, present in the OrthoInspector package. You need to setup at least 2 values:
the path to the file database.properties, which contains database connection instrucitons (also present in the package).
the path to the blastp binary (part of the NCBI blast+ package)
the path to a blast database containing all the proteomes used to generate the OrthoInspector database.
3. Some comments about the options...
-out path: the name of the output filename. if not used, write the result on standard ouput (stdout).
-outfmt integer: Format used for the output files. A integer chosen from:
RAW format (verbose file)
CSV format
TSV format
XML format (orthoinspector specific)
FASTA format
ORTHOXML format (http://orthoxml.org)
-organism_list 'integer,integer,...' : for all queries, you need to defined a list of organism from which orthologs are extracted. For instance, my query is a human protein and I want its orthologs in the mouse and the dog. These 2 targets are selected by their database ids. The list of all organisms and their ids can be displayed with:
The output of this command shows us that the mouse and the dog have for organism id "2" and "16". We will then use this option by creating a list of ids separated by a coma.
-organism_list '2,16'
Note that the keyword "all" can be used to retrieve orthologs from all organisms.
-organism_list 'all'
Finally, Verbosity can be setup in the configuration file (oi_client.properties) with the field debug.verbose (1=true, 0=false).
4. Retrieving orthologs
a. related to a single sequence (-mode single)
This method extracts all orthologs related to a specific sequence, selected by its id, name or any other description that was furnished in the fasta headers of the original proteomes used to generate the database.
The best choice is to use the unique id of a sequence as a query. Using a query that matches several sequences (such as an organism name), will cancel the extraction.
Minimum usage:
java -jar OrthoInspector_comline_install.jar -mode single -query textual_query -organism_list 'list_of_integer_coma_separated'

Concrete examples:
java -jar OrthoInspector_comline_install.jar -mode single -query MTMR1_HUMAN -organism_list '2,25,64,36'  -outfmt 2
(find orthologs of MTMR1_HUMAN in 4 organisms and display the result in CSV format on standard output)
java -jar OrthoInspector_comline_install.jar -mode single -query MTMR1_HUMAN -organism_list 'all' -outfmt 6 -out result.xml
(find orthologs of MTMR1_HUMAN in all organisms and save the results in orthoxml format in the file result.xml)
b. related to an organism (-mode whole_organism)
This method allow to extract all orthologs related to a specific organism, selected by its id. The id is an integer, representing the organism, the list of available ids can be displayed with option -organism_ids.
Minimum usage:
java -jar OrthoInspector_comline_install.jar -mode whole_organism -query textual_query -organism_list 'list_of_integer_coma_separated'

Concrete examples:
java -jar OrthoInspector_comline_install.jar -mode whole_organism -query 2 -organism_list '25,64,36'  -outfmt 2 -out res.csv
(extracts all proteins of organism 2 and their orthologs in organisms 25,64 and 36 in CSV format)
java -jar OrthoInspector_comline_install.jar -mode whole_organism -query 64 -organism_list 'all' -outfmt 6 -out result.xml
(extracts all proteins of organism 64 and their orthologs in all other organisms in ORTHOXML format)
c. related to a set of sequences compiled in a fasta file.
This method allow to extract all orthologs related to a set of sequences saved as a fasta file.
Each sequence is first analysed as a textual query, the first header characters between > and the 1st space are considered as a potential sequence id. If an exact match of this id is found in the database, the orthologs of the database sequence are automatically selected. For instance, one of the sequence has the following header ">MTMR1_HUMAN Homo sapiens, myotubularin 1". MTMR1_HUMAN is then considered as a potential ID, if one of the sequences used used to generate the database had the same id, its orthologs are selected.
If not ID can be matched, the fasta sequence is blasted (via blastp) to the database setup in the oi_client.properties files (a blast database containing all the proteomes used to generate the OrthoInspector database). The best hit from this blast, a sequence belonging to the database, is then selected and its ortholog are associated to the original fasta query.
In some cases, the blast best hit can be a sequence from another organism. For instance, if the sequence MTMR1_HUMAN is blasted to a database where this gene (mtmr1) is absent is human, but at the same time another primate proteome (used to generate the database) contained this gene, then the best it from the human fasta query is likely to be its primate counterpart ( for instance H2PX24_PONAB, mtmr1 of the Orangutan). To avoid such issue and force the blast search in a specific organism, you can use the option -query_organism (see below).
A the end of the search, a log file called associations.log is created and describes in 2 columns with fasta sequence was associated with which database sequence.
Minimum usage:
java -jar OrthoInspector_comline_install.jar -mode batch_fasta -query_file fasta_file -organism_list 'list_of_integer_coma_separated'

Concrete examples:
java -jar OrthoInspector_comline_install.jar -mode batch fasta -query_file proteins.fasta -organism_list '2,25,64,36'  -outfmt 2 -out res.csv
(find orthologs of the proteins from the fasta file, match them only to sequences of organism 2 that are present in OrthoInspector database via blast,  extract their orthologs in 4 organisms)
java -jar OrthoInspector_comline_install.jar -mode batch_fasta -query_file human_proteins.fasta -query_organism 1 -organism_list 'all' -outfmt 6 -out result.xml
(find orthologs of the proteins from the fasta file, match them to any organism present in OrthoInspector database, retrieve their orthologs in all organisms, save the results in orthoxml format in the file result.xml)
You successfuly installed your database ? Here's the everyday use of OrthoInspector.
1. Create a rapid query
There is 3 steps to create a query with the help of the graphical interface.
Select the query by textual search or blast query
Select the organisms for which you want to retrieve orthologs
Launch the query to display results
Note: for maximum database engine compatibility, the search is case sensitive!
2. The results and their exploitation
Once the orthologs linked to your query are loaded, you can use several Visualization tools to analyse this ortholog family. You can loaded n different queries, that can then be selected via different tabs.
The results can be exported in different file formats via the "save" menu.
The set of queries (the current work session) can also be saved via the "session" menu, to retrieve the same set in a future launch of OrthoInspector.
For analysis and visualization of the loaded ortholog families, two tutorials are dedicated to the "Best-hit density graph" and "Phylogenetic profile" tools. (the first one is activated only if you generated the blast tables during the installation process).
3. Exporting large datasets or whole sections of the database
Database menu -> Export data : allow you to access the exportation tool.
Large datasets of orthologs can be extracted via the "export" tool in the "save" menu.
You can choose for which organism pairs orthologs are selected and exported: for instance, all the orthologs between human and mouse, only the many-to-many orthologs between human and mouse...
You can save the data in different file formats
4. Access to other tools
The 3 remaining menus directs you to the following tasks :
Comparative genomics menu: contains the "phylogenetic profile based extraction" tool (see tutorial).
Database menu -> Installation: used to perform the database installation via the graphical interface, not that this option disappear from the menu when disabled in the GeneralProperties.properties configuration file. This option is useful to setup the graphical interface as a simple client querying the database.
Database menu -> Statistics: a tool calculating several statistics from the database: number of best-hit/inparalogs/orthologs between organisms pairs, number of proteins with no orthologs in specific organisms... etc... the results can be saved as a CSV file and analysed in an Excel table. This tool was used in particular to produce the orthology heatmap published in the first OrthoInspector manuscript.
Tools -> Blast viewer: A very basic blast result viewer, allow to you visualize the blasts that generated your selected orthology relation. Activated only if you generated the blast tables during the installation process.
Sequences answering to a particular phylogenetic profile can be batch extracted in OrthoInspector. Here is a complete example of such extraction.
1. How is performed the extraction
The profile is based on 3 criteria :
'base organism' : you select this organism as the source of the extraction. All the proteins of the organism are analysed one by one. When a protein respects the criteria of the selected phylogenetic profile, it is extracted. All proteins from other organisms which were linked to it by orthology relations are also extracted.
PRESENCE criteria: assigned to all organisms in which we want to find an orthology relation ( the sequence S of 'base organism' must have an ortholog in this organism).
ABSENCE criteria: assigned to all organisms in which no ortology relations should be described ( the sequence S of 'base organism' has no ortholog in this organism).
N/A criteria: is used to exclude organisms from the extraction.
To understand the way proteins are extracted, consider the figure below. Concretely, for each sequence of the 'base' organism, if a sequence Sbase has an ortholog in all organism assigned to a 'presence' criteria (organisms A,B and C) and no orthologs in all organisms assigned to an 'absence' criteria (organisms D and E), then Sbase and all its orthologous sequences (from organisms A, B and C) are extracted. Note that you can restrict the type of orthology relation that is extracted (1-to-1, 1-to-many, many-to-many).
Following this first step, the stringency of the extraction can be increased. Indeed, there is 2 alternative ways of combining the 'presence'/'absence' criteria, as described in the figure.
We called these 2 methods AB-AC and AB-AC-BC, reflecting the reciprocity that characterize the second approach:
AB-AC method : For a given phylogenetic profile, this method will extract more sequences. Indeed, the reciprocity of the orthology relation between the organisms A,B and C is not compulsory. We advice to use this method as a first step, in particular when you target orthlogs from large protein families, where the assignation of the different paralogs to clear orthology relations is not easy). It gives also better results when a profile is defined between distant organisms and when the reciprocity of the homology between the organisms A, B, C is not necessarily detected because of low sequence conservation.
AB-AC-BC method : more stringent and extract sequences that are strictly corresponding to the phylogenetic profile. It is recommended to use this method for strict comparative genomic analyses, when you want to avoid the selection of proteins that would be false positives. If you original proteomes contained a single protein sequence per gene and if you think that your proteomes are of good quality and quite complete, this method produces the best results.
2. Define your phylogenetic profile
Since version 2.00, criteria are assigned with the help of an interactive tree. The criteria can be assigned to every tree level by clicking on the different tree nodes (a button is swithching between the N/A, pres, abs criteria). When clicking on a node, all the organisms of the clade are automatically assigned to the selected criteria. The resulting phylogenetic profile can be easily confirmed with the green/red boxes on the right of the tree.
For instance, the following screenshots describes the extraction of all sequences of Acyrthosiphon pisum that have orthologs in Nematoda, in Arthropoda, in "Chordata that are not Craniata" and that have no orthologs in Craniata. All selected species are described in the "current profile" green/red boxes.
3. Reading the extracted results
Currently the orthologs matching the profile are compiled in a CSV output, with the following columns.
strict_validation: YES/NO (explained in details below)
orthology_id: the integer unique id of the orthology relation currently described in the current line.
relation_type: the orthology type for the current line (1-to-1, 1-to-many, many-to-many).
identifier_a: identifier of the sequence a in organism A.
organism_A: complete name (genus+species) of organism A.
identifier_b: identifier of the sequence b in organism B.
organism_B: complete name (genus+species) of organism B.
description_a: complete description of sequence a.
description_b: complete description of sequence b.
sequence_a: the sequence itself.
sequence_b: the sequence itself.
Relations with co-orthologs (1-to-many, many-to-many) are then described with several lines.
→ describes the 1-to-many relation protein_1 ↔ (protein_2,protein_3)
1245;protein_1;protein_3
1245;protein_1;protein_2
The STRICT_VALIDATION criteria:
This criteria is reliable only when the AB-AC-BC method is used ! When an orthology relation of type 1-to-many or many-to-many is selected, all the proteins of the relation are present in the CSV output. However, when checked individually, all the proteins of the corresponding inparalog groups are not necessarilly validating the reciprocity (but at least one did, that's why the relation was selected). In the ouput, the proteins from an inparalogy group that respects the reciprocity (value=YES) or not (value=NO) are differentiated by this column.
Let's imagine that base organism and organism A are linked by a one-to-many relation, two co-orthologs (noted A1 and A2) from organism A being inparalogs relative to the base organism ("many" side). The reciprocity is verified between organism A and organism B/C with two one-to-one relations but they are both linked to A1 (when analysed in the context of organism A, A2 had no orthology to organisms B and C). A1 is then assigned to 'YES' strict_validation, A2 to'NO' strict_validation.
This tool can be used only if you used the -produce_nohit_tables option during the installation process.
This tool is generating statistics which are grouped in 2 categories:
Low-level statistics: these are global statistics such as the number of sequences, number of inparalogy relations, orthology relations, best-hit predicted during the installation. Low-level statistics are calculated immediately when the Advanced statistics tool is launched.
Advanced statistics: these are more advanced and generally meaningful numbers when one knows well the species of his dataset. More details below.
Statistics are generated in the format of a CSV file, which can be open in Excel or OpenOffice to generated graphs or heat maps (see below example).
2. What is the utility of the advanced statistics ?
The advanced statistics calculated by Orthoinspector are useful to highlight weird orthology prediction behaviour to to low quality/proteomes. Even better, when well exploited these statistics can highlight evolutionary trends at very large scales ! The good exploitation of the statistics is mainly dependant to your creativity, but below we will cite a few examples of interpretations bases on our previous experiences.
Note: for large datasets (hundreds to thousands), generating the advanced statistics can be a very slow process, in particular if your SQL tables are very big and your database a bit slow when it comes to the exploitation of the table indexes. This is particularly true for the "best_hit" statistics.
a. Highlighting low-quality proteomes
As mentioned in the installation tutorial, the proteomes used into orthoinspector should avoid transcript variants and contain 1 sequence per gene. When downloading proteomes from online sources, this is an easy task, thanks to Uniprot "reference proteomes". But if you use sequence dataset generated in the lab from high-throughput sequencing, this can be difficult (on top of potentially having an incomplete proteome).
With the advanced statistics, proteomes issues can be highlighted:
high values in the "no_hit" statistics can highlight proteomes for which many sequences didn't match any other sequence in the database (or gene expansions if your species is phylogenetically isolated compared to the other organisms).
high/low values in the "no_hit_to_orga" can also highlight low quality proteomes, but the corresponding values are directional and related to an organism pair. For instance, if you generate a mouse proteome and its "no_hit_to_orga" for the human is >1000, this means that your proteome is complete, most mouse proteins should match human proteins even at stringent tresholds.
b. Gene families expansions / whole genome duplications
An interesting application of the "best_hit", "onetone", "onetomany" and "manytomany" statistics is to highlight proteins families expansions or whole genome duplications. These "statistics are directional and a value is related to 2 organism.
For instance, in the first publication of Orthoinspector, we used the "1-to-many" statistics to generated the figure below. We just opened the CSV table corresponding to the "1-to-many" statistics. There, the number of predicted 1-to-many orthology relation was reported for all organism pairs. After a rapid nomalization by the proteome size (also copy paste from the statistics), we represented the corresponding value as a heatmap. The main whole genome duplication events that are documented for teleostei vs other vertebrates, the second recent duplication that occured in some fish clades and whole genome duplication in plants, appeared immediately are red areas. You can note also the high values for the fish vs the ornithorynchus which was due (at the time) to an incomplete proteome resulting in overpredictions of paralogs for the fish compared to the ornithorynchus, demonstrating that high quality proteomes are essential for differentiating real evolutionary events from data incompleteness.
Distribution of 1-to-many relations over 59 organisms. The normalized number of 1-to-many relations is calculated for each organism pair. Normalisation is done by dividing the observed number of relations by the maximum number of potential relations (the size of the largest proteome of the two compared organisms). The 1-to-many relation is oriented from the x axis to the y axis.
This tool can be used only if you created the blast tables during the installation process.
After creating a query in the main interface, the best-hit density graph can be created by clicking on the corresponding button in the bottom-left corner.
Nodes represent the sequences that were loaded in the table of the main interface. Edges represent the best-hits that links these proteins. It is a gravity directed graph, sequences with high score or low e-value show a short distance between there nodes.
1. Manipulating the graph
Here are the main operation you can do with the graph:
Left-click : center a node and show its description on the right side.
Right-click : zoom to center the whole graph.
Left-click + drag : translate the graph.
Right-click + drag : zoom.
Alive checkbox : if not selected, freeze the graph dynamics.
Sliders: change the score/e-value tresholds to show/hide corresponding edges.
2. Changing the thresholds dynamically
This manipulation facilitates the visualisation of a protein family.
The following example show how we can dynamically separate the myotubularin family by the main phyla describing innovations for this family.
This tool is organizing and representing all the orthology related to a query in the form of a phylogenetic profile table. This table is a comprehensive summary of the evolutionary relation of several sequences belonging to the same protein family.
We describe such representation with the help of the figure below. The original query was the sequence ENSP00000359417, belonging to Homo sapiens.
The orthologs of ENSP00000359417 are represented by the first column. The Homo spaiens line is empty (it's the query). It has no orthologs in E. cuniculi (red box). A single ortholog in M. musculus, P. pygmaeus and C. intestinalis (one-to-one relations). It has 2 co-orthologs in D. rerio as described by a one-to-many relation with this organism (1 sequence in human, 2 co-orthologs D. rerio). The box of Danio rerio, in the first column, includes the number "2" to highlight this duplication in D. rerio.
The absence of orthologs in E. cuniculi (a fungi) indicates that the gene appeared with animals.
The diagram will not stop there, and verify which Homo sapiens proteins are also concerned by these orthology relations. The 1-to-many relation with C. intestinalis highlights 2 potential duplication that occurred in human evolutionary history since the craniata / urochordata (tunicates) separation. ENSP00000359423 and ENSP00000345752 are 2 other human co-orthologs, from the C. intestinalis point of view. They are used to add 2 new columns in the diagram, extending the family diagram from the ancestral point of view of tunicates. This generates the big C. intestinalis box (1 gene) which overlaps the 3 columns of the 3 human co-orthologs.
In the 2 new columns and for all other organisms, the boxes are not overlapping like in the case of C. intestinalis, as these 2 other human queries are linked to other ortohlogs in thiese organisms. These other orthologs are all linked by one-to-one relations. Consequently, the 2 duplications probably occurred after the craniata / tunicates separation but before the fish / mammals separation (D. rerio is a fish, M. musculus and P. pygmaeus are mammals).
2. Different diagrams are generated from different evolutionary point of views !
The previous example highlight the influence of the original query to generate the diagram. Here is a second diagram, that we generate by using the C. intestinalis ortholog as a query (the unique sequence that described a one-to-many relation with the 3 human co-orthologs in the previous example.) Note the different layout, this screenshot show the interactive version of the diagram, where you can click on the boxes to retrieve data, or exchange the columns to improve the visualisation of the evolutionary events that characterize the analysed family.
The second diagram is generated with this sequence, ENSCINP00000015031, belongning to C. intestinalis. From the tunicates lineage point of view, which possess only 1 gene for this family, all duplications occurred in the craniata lineage, to which it doesn't belong. Consequently, we have a single column with higher numbers, that highlights 2 duplications events in the mammals and 3 duplications events in the fish lineage, from the tunicate point of view (3 co-orthologs in mammals, 4 in fishes).
Playing with such "point of views" from different sections of the tree of life can be useful to highlight different messages.
3. Interacting with the diagram to clarify the evolutionary message.
Databases describing very large phylogenetic scales (for instance all eukaryotes) can produce very large diagrams with dozens of columns, in particular for the most ancestral genes for which many duplications can be discovered. The interactive version of the diagram is particularly useful in such case, as its generation doesn't necessarily produce the most readable column / lines order. Consequently, play with the columns and reorganize their order as necessary, the box that are overlapping several columns, representing one-to-many and many-to-many relations will automatically adapt their borders and numbers. We noticed that, by increasing the number of "large" boxes, overlapping many columns, the diagram are generally more readable and highlight more easily interesting evolutionary scenarios.
The Venn/Euler diagram visualizer is a way of representing the orthologous relationships between different organisms in an easily understandable manner. It uses the venneuler package.
This package was published under the following reference: Venn and Euler Data Diagrams, Leland Wilkinson (2010)
A Venn diagram represents the intersection of orthologs between 3 organisms. This representation is mathematically correct, the surface of each intersection corresponding to the amount of sequences in each possible intersection.
The Euler diagram can combine more then 3 organisms. However, the resulting combination of circles will not always be a good representation of the underlying data. The Venneuler library uses a statistical framework to find the "best" circle overlap representation to represent organism intersections. Consequently, the result is supported by some scores helping to estimate the quality of the representation (see below for details).
2. User interface
A : Selecting a mode. For a simple and fast representation, you can choose the Classic Mode. The Advanced mode gives you more options for a more complex representation.
B : This is the selection panel. Here you can choose the organisms (and their relationships) that you want to visualize.
C: This is the control panel. Here you can select the maximum number of threads that will run at the same time to perform the calculations. The progress bar will inform you of the progress of the calculations and saving of the results.
D : Here you can choose the kind of orthology you want to display (1-to-1, 1-to-many, many-to-many)
E : When the calculations are done, the resulting diagram will appear here.
3. Selecting the organisms
The interface gives you two ways to select the organisms :
A/ Classic mode: 3 organisms diagram
B/ Expert mode: more than 3 organisms diagram
In the second mode, you can select as many organisms as you want (Select them in zone (1), push the “ADD” button to add them to the selected organisms zone (2).
You can remove one organism by pushing the “remove” button or all of them by pushing “remove all”. Once all your organisms of interest have been selected, it is time to select the relationships you want to appear on the Venn/Euler diagram. To do that, press the “Select Relationships” button. Once you have selected all the relationships of interest, press the “Accept” button. You can see that the “draw” button is now enabled, on the selection panel. Push “draw” to start the calculations.
4. Critical analysis of the generated diagram
As mentioned above, when asking for the intersections between more than three organism, the resulting Euler diagram is the "best possible representation" of the organism overlaps. If you have selected relationships that don’t fit in a Venn/Euler diagram, the produced diagram may be hazardous. In particular, you should check two statistics calculated by the Venn-Euler library, in the bottom-left dialog:
Stress : 0.32433868777480857
Correlation:  82%
To better understand these values, see "Venn and Euler Data Diagrams", Leland Wilkinson (2010). To resume, a good stress value should be < 0.05, the correlation should be as close as possible close to 100%. If these scores are poor, try to understand why the Venn/Euler diagram failed and select different circle intersections.
Phylogenetically relevant intersections are generally producing the best representations. For example, the following diagram represents:
the orthologs in 3 rodents, for all possible combinations (mouse&rat + mouse&guinea_pig + rat&guinea_pig + mouse&rat&guinea_pig)
the orthologs in 3 saccharomyces cerevisiae strains, for all possible combinations (S288c&YJM289 + S288c&VIN13 + YJM289&VIN13 + S288c&YJM289&VIN13)
we add the "mouse&S288c" intersection to link compare the 2 groups with these 2 organisms.
we ask to the algorithm to consider only 1-to-1 relation
Here are the statistics:
Correlation : 96%
Stress : 0.0673292885238185
The stress value is close to 0.05, the Euler representation is not perfect but quite good. As expected there is much more 1-to-1 orthology relations between the 3 yeasts than between the 3 plants.
5. Interacting with the diagram
Once the Venn/Euler diagram appears in the result area (E ), you can interact with it in several ways:
By clicking with your mouse’s left button on an intersection of organisms, or an organism alone, you can save the sequences relatives to the concerned orthologous proteins in a file, in FASTA format.
By clicking with your mouse’s right button, on an organism, an intersection or the background, you can change its color.
The “options” menu allow you to:
Show/Hide the labels
Show/Hide the colored disks
Show/Hide the black circles
5. Export your results
The “Save” menu allow you to :
Save the diagram as a JPEG image
Save the diagram as a PNG image
Save the content of the log (and the values of the stress and correlation statistics).