Subsections
This section will shortly present some of the fundamental aspects of Ordalie. Most of the following sub-sections will be treated in more detail in subsequent sections of this manual.
Ordalie can read and write FASTA, MSF, RSF, ClustalW ALN, Macsim/XML and ORD (Ordalie file format) file formats. When loading the alignment file Ordalie check for consistency between file extension and the inner file format, and raise an error if the two differ.
Upon alignment loading basics information are logged in the “Log Console” for the global alignment and for each sequence: length, isoelectric point, ... The pairwise identity scores are also logged for the global and for each group of sequence if present.
For a given alignment loaded in Ordalie, it is easy to understand that many different instances of the same alignment may exist. One instance could have a given set of sequence clustered with a given sequence conservation computation, and another instance could have another set of clusters, in order to estimate different hypotheses. These instances are called “snapshots” in Ordalie and can be annotated, saved and retrieved at any time (see 3.5.2). This is made possible thanks to the database embedded in Ordalie.
Once the alignment is loaded, Ordalie tries to recognize if the sequences names are UniProt, RefSeq, or Protein Data Bank (PDB) accessions names. If a sequence name is prefixed by a database identifier (for example, sw for SwissProt, gi for Gene Identifier, PDB for PDB) the prefix will be removed by default. Thus, the sequence name >sw|P12345 will appear as P12345 in Ordalie. The list of recognized bank prefixes and their separator can be changed through the 'Preferences' menu item.
If sequence names are proper databases accession, Ordalie can then fetch information on these databases upon request (see 5.4.4).
Ordalie is dedicated to the analysis of protein multiple sequence alignments. Although it can read DNA/RNA alignments, most of its functionalities will be disabled for such sequence types. Ordalie can still be used to view or edit such alignments.
In this manual, the mouse left, middle and right buttons will be designed as <B1> or <Button-1>, <B2> or <Button-2>, <B3> or <Button-3> respectively. Any words enclosed by '<' and '>' refer to the corresponding keyboard key.
Sequence names selection and amino acid sequence range selection are always achieved using the same mechanisms:
Sequences names can be selected by left-clicking on their names. The selection mechanism obeys standard rules:
Table 1:
Keys combination to manipulate sequences names
| Keys |
Action |
|---|
| <Button-1> |
Selects the sequence under the mouse pointer |
| <Control> + <Button-1> |
If the sequence name under the mouse pointer is UNSELECTED, add this sequence to the current selection |
| |
If the sequence name under the mouse pointer is SELECTED, remove this sequence from the current selection |
| <Shift> + <Button-1> |
Adds all sequences from the previously selected one up to the current sequence to the selection |
| <Control + a> |
Selects all sequences |
| <Control> + <x> |
Cut selected sequence(s) |
| <Control> + <c> |
Copy selected sequence(s) |
| <Control> + <v>Paste sequence(s) |
|
|
Sequences Cut/Copy/Paste is available at any time, and allows the user to duplicate, remove or change sequence order.
| |
|
|
| If a sequence is duplicated using Cut, Copy then Paste, its name will be suffixed by __<n> where n is the copy number. |
|
| |
|
By default, no residue selection or edition is allowed. This can only be achieved within particular tools, like 'Editor', 'Cluster', 'Phylogenetic Tree', or 'Superposition' tools. In such mode, zones of residues are selected by:
Table 2:
Keys for amino acid sequence zone selection
| Keys |
Action |
|---|
| <Button-1> |
Sets the starting point of the zone to be selected, |
| <Button-3> |
Sets the end of the zone, the selected zone becomes grey, |
| <Control> + <Button-3>Unselects the zone under the mouse pointer. |
|
| <Control> + <Button-1> |
Selects the feature under the mouse pointer |
| <Control> + <Button-3> |
Unselect the feature under the mouse pointer |
|
| |
|
|
| It is possible to select the zone corresponding to a feature item (for example a PFAM domain) by clicking on this feature item with <Control + B1>. |
|
| |
|
Several zones can be defined one after the other, either by left/right clicks and/or feature selection.
In order to manage snapshots, features, 3D structures, etc... Ordalie internally embeds a SQLite database [3]. This database is lightweight, and can easily be copied or moved around. The Ordalie file format (. ord extension) is in fact the SQLite database itself.
The scheme of the database can be found in Appendix 6.1.
In short, the database contains:
- All Ordalie state variables, thus allowing to restart an Ordalie session with the same settings.
- All sequence information not linked to the amino acid sequence (length, isoelectric point, description, ...).
- The snapshots, with their sequence composition and associated clustering.
- All features attached to sequences.
- All information related to the PDB entries present in the original alignment or added later on (headers, atomic coordinates, superposition matrices, ...) and all the associated 3D objects.
As an Ordalie files (the SQLite database) contains all the information, it should be preferred as being the default working format.
The Ordalie main window can be separated in several parts, from top to bottom (see fig. 2).
Figure 2:
Ordalie main window
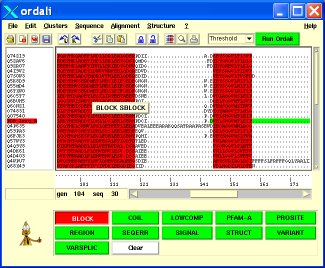 |
All the different menus are described in detail in section 5 of this manual. In short, the “File” menu manages input/output files, as well as printing. The “View” menu controls the appearance of the user interface. It contains options to toggle on or off parts of the main window, to change the font size, or to toggle the full-screen mode. The “Sequence” menu allows changing the sequence names, browse, edit or retrieve sequence information, search for sequence motif, compute sequences identity. The “Alignment” menu gives access to all tools linked to the alignment: alignment editor, clustering, phylogenetic tree, features editor, ... The “Structure” menu is dedicated to the structural analysis of the alignment if any sequence corresponding to a 3D structure is present. The menu gives access to a structure superposition module, the 3D viewer, a secondary structure colouring scheme according to sequence conservation, and allows saving PDB files. Finally, the “?” menu allows the access to the on-line documentation and Ordalie version information.
Below the menus, the icon bar gives direct access to some of the most useful menu items. When the mouse pointer is above a button, a small message box describing the button's action appears.
3.5.2 The Snapshot bar
As previously mentioned, working with an alignment may lead to several trials in terms of sequence clustering or even amino acid alignments. A trial can be saved as a snapshot of the loaded alignment. A given snapshot can also contain a different set of sequences than the original loaded alignment in case of deletion or addition of sequences.
In the snapshot bar from left to right, the combobox allows selecting a given snapshot. The “Annotation” button shows or hides the annotation of the current snapshot if they exist. Annotations are created through the “Annotate snapshot” item in the Alignment menu (see 4.12). The “View Zone” button toggles the zone used to make the clustering of the given snapshot if it has been clustered. The “Info” button pops up a window the information relative to the snapshot. This information is sought when creating the snapshot. The “Reset” button will reload the current snapshot which will erase all changes made so far. The “Overwrite” button saves the current changes to the current snapshot while the “New” button creates a new snapshot.
The sequence names are displayed on the left part of the frame, the amino acid sequences on the right part.
| |
|
|
<Mouse-wheel> scrolls names and sequences up and down.
<Control> + <Mouse wheel> scrolls the amino acid sequences horizontally. |
|
| |
|
The sequence names highlighted in red correspond to PDB sequences. If there is information associated to a given sequence (present in Macsim/XML, ORD files or retrieved on-line, see 5.4.4) a yellow message window containing a description of the current sequence appears above the sequence pointed by the mouse pointer. A right-click (mouse button-3) on a given sequence name displays a more detailed message window containing the accession, the bank ID, the organism, the length and the description of the sequence.
Below the sequence names, an entry box allows the user to search a sequence by its name, or part of its name. After hitting <Return> the first sequence found will be displayed as the top sequence in the window.
The right part of the frame contains the alignment itself (amino acids sequences), the ruler, indicating the position of the column, the horizontal and vertical scrollbars and the position counter. Any mouse motion above the amino acid sequences will update the position counter that shows two positions for the residue below the mouse pointer: the 'seq' position is the position of the residue inside its sequence, the 'gen' position corresponds to the position of that residue inside the snapshot.
| |
|
|
| The position within the sequence is referred to as the local position, the position within the snapshot is referred to as the global position. |
|
| |
|
When a given feature is displayed, moving the mouse over the feature will display the note associated with it, for example, in the case of a PFAM domain, the description of the domain will be shown. If there are several features superposed, the first description corresponds to the top feature.
As mentioned above, while the mouse wheel and the horizontal slider allows moving along the amino acid sequence, it is also possible to jump from position to position using the numeric keypad and the left and right arrows. For example, by typing '200' + <Right Arrow> key, the window will go 200 positions to the right. Similarly, typing '500' + <Left Arrow> key will scroll the alignment 500 positions to the left.
This frame is not shown by default, but it can be toggled on or off using “View -> Show/Hide scores” menu. When residue conservation has been computed, a score is assigned to each column of the snapshot at the global level and at the groups level if available. The Scores frame shows these normalized scores (between 0 and 100) for each column, the colour of the score line corresponding to the group colour, the black line corresponding to the whole snapshot.
The Control Panel is at the bottom of the main window. By default, the frame only contains a welcome message. When available, this frame contains buttons corresponding to the available features of the current snapshot, one button per feature. Pressing a button will colour the button in red, and display the feature on the snapshot. Pressing the button again will turn it to green and remove the feature.
| |
|
|
| The features are displayed in the order the buttons are pressed. To put a feature over another one, play with the buttons ! |
|
| |
|
When changing tool, the content of the Control panel will change according to the tool. The content of the Control panel will be described in each tool section.
Features are a central concept in Ordalie. A Feature can be defined as a characteristic attached to a zone of a sequence, a group of sequences or to the global snapshot. A sequence / group / snapshot feature can contain several items (for example, a sequence feature can contain several PFAM domains). One of the strength of Ordalie is its ability to investigate these features in different contexts, for example in the structural context of the protein.
Features are imported into Ordalie through the Macsims program XML output file [15], or using a dedicated feature file format (see section 6.4) or defined by the user through the Features Editor tool (see 4.10).